![]()
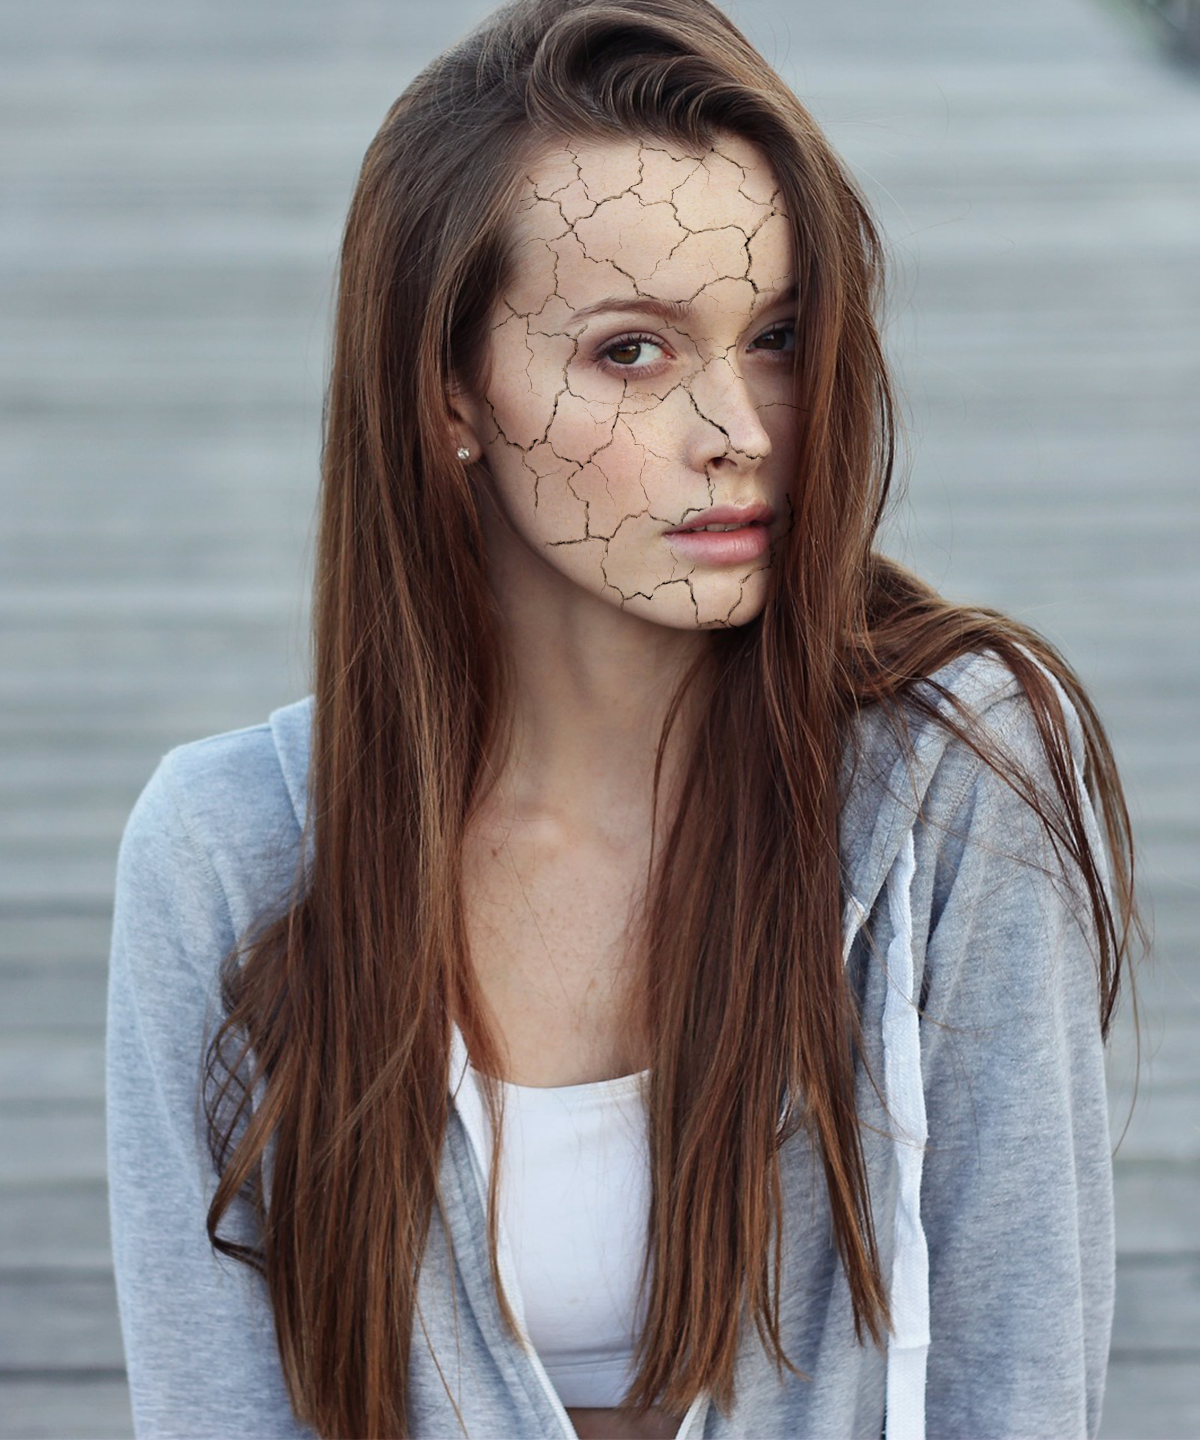
Since it’s summer, I thought I’d stay on theme and show you how to make a cracked skin effect.
Not only is this effect relatively easy (and fun) but it can also serve as a good reminder to wear sunscreen and lotion!
Step 1
As always, you’ll want to make sure you’re starting in a New Document. You’ll also want to use a picture of a person for this tutorial as well as a cracked texture of the ground. If you missed the first tutorial in this series, you should be able to find either of these pictures on a royalty free image website such as pixabay.com. You’ll need to make sure you’re using royalty free images if you plan on using them for your book’s cover or promotional posters.
If however you’re here just for fun or practice, you can use a search engine to find the pictures you need.
For the cracked ground picture, you’ll want to use one that has no obstructions, many cracks, and is more or less level.
For the person picture, you can use any picture you’d like, as long as there is a clear spot of skin somewhere. I haven’t tried this effect on clothing, but I’d imagine it would still work. Any picture with a clear spot of skin will do.
To keep things simple, these are the pictures I’ll be using.


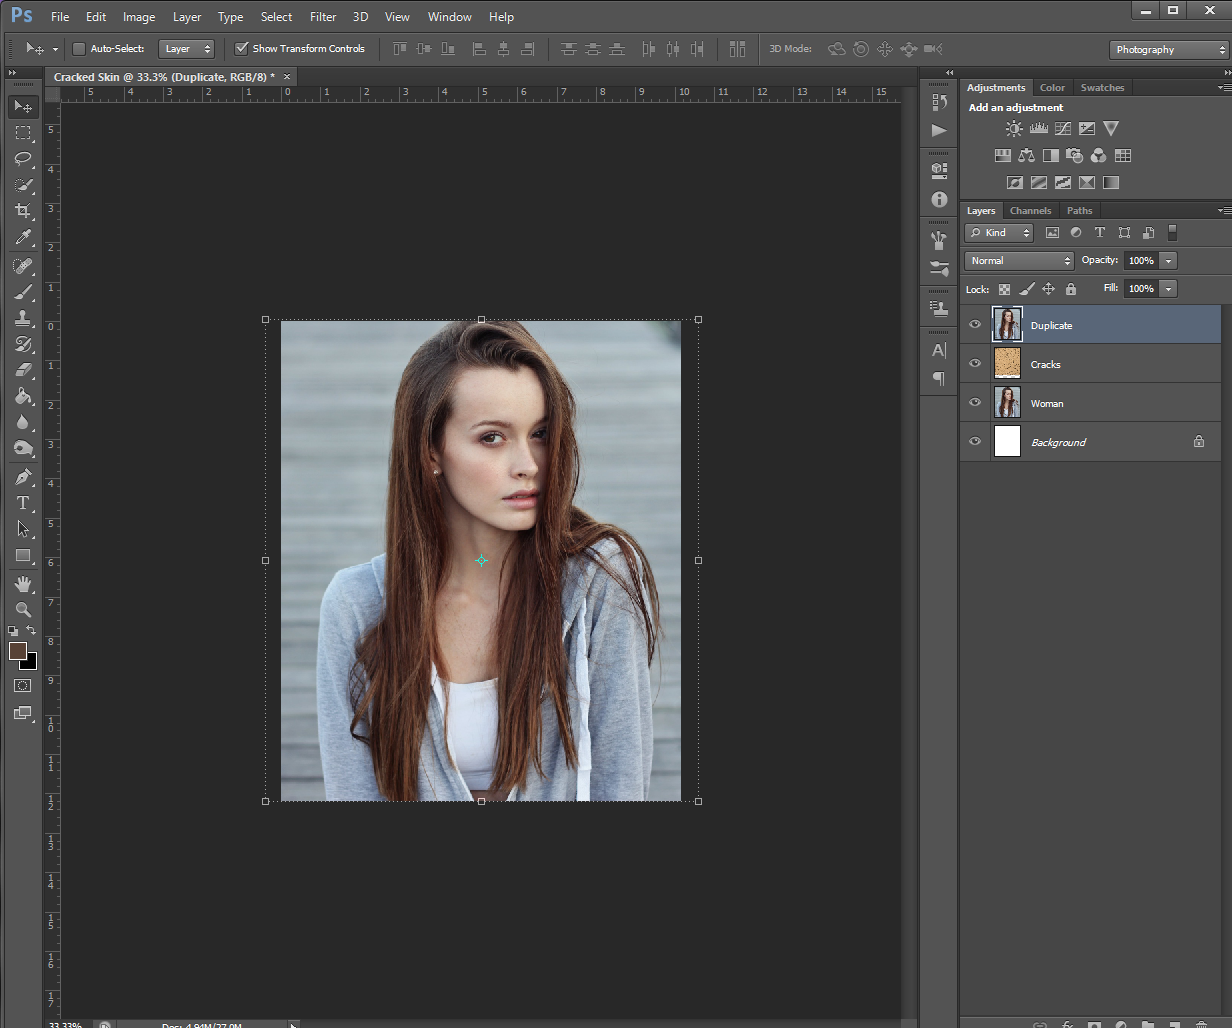
Once you choose what pictures you’d like to work on and have them in your work document, go ahead and Duplicate the person layer. If needed, you can also rename the layers to keep things straight. I renamed the original person picture “Woman”, the cracked texture “Cracks” and the duplicate layer “Duplicate”.
Step 2
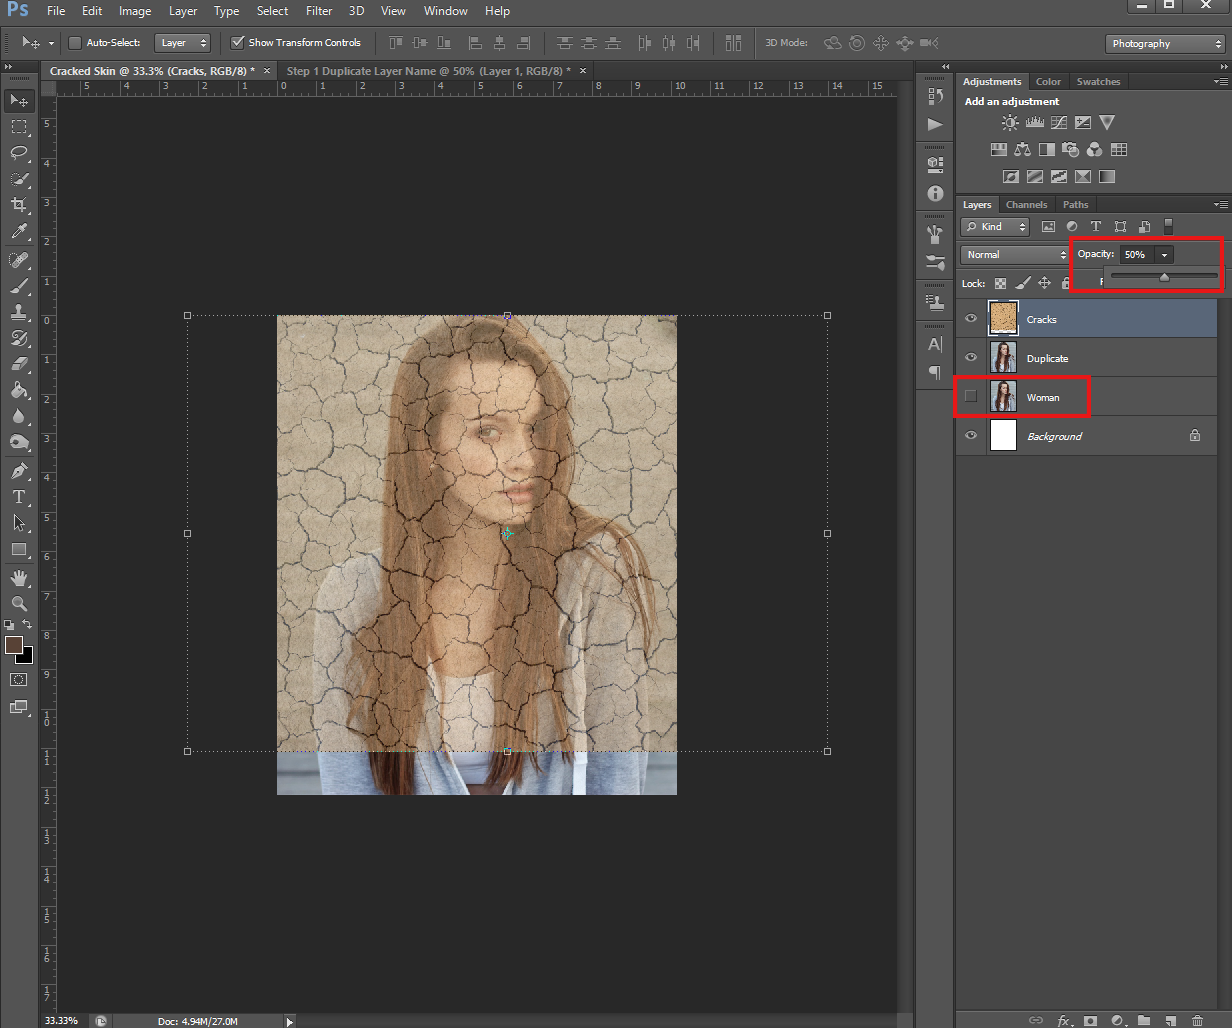
Now that you have yourself all set up, change the Cracks layer Opacity to about 50% or lower. You’ll want to be able to see the face underneath, but you’ll also want to be able to see the cracks. If needed, you can also Hide the original person layer by clicking the eye next to it’s thumbnail in the Layers panel and/or rearrange the layers so the Cracks one is on the top.
Once you’ve changed the layers Opacity, go ahead and align it over your person picture if you haven’t already done that. If needed, you can also rotate and/or resize the picture. The goal here is to get the best looking cracks over the person’s face.
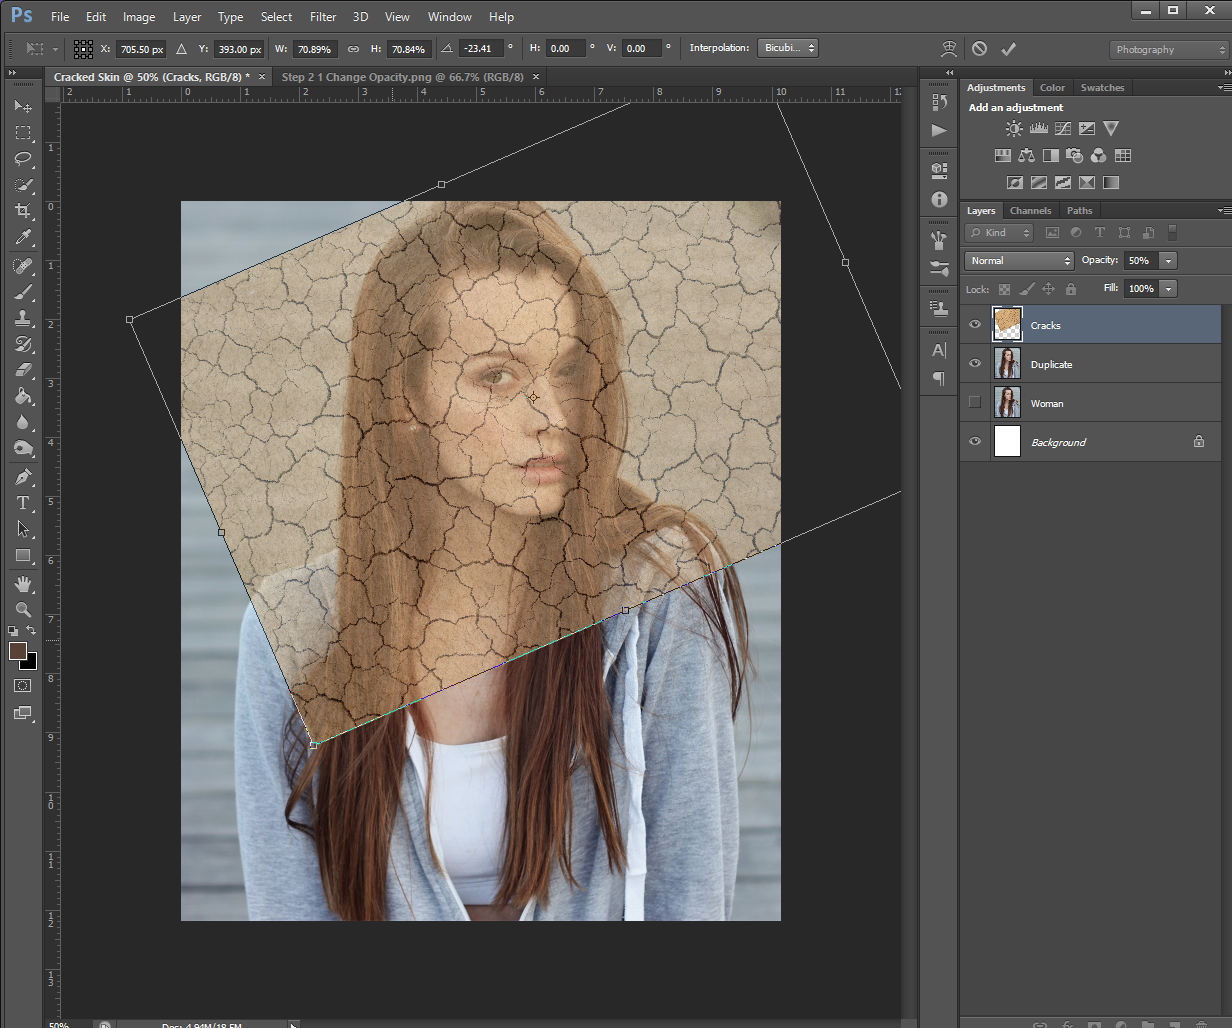
Make sure you don’t resize the cracked texture picture too much, you’ll want to keep it slightly bigger than your person for the following steps. Don’t forget you can always erase what you don’t need at the end.
Step 3
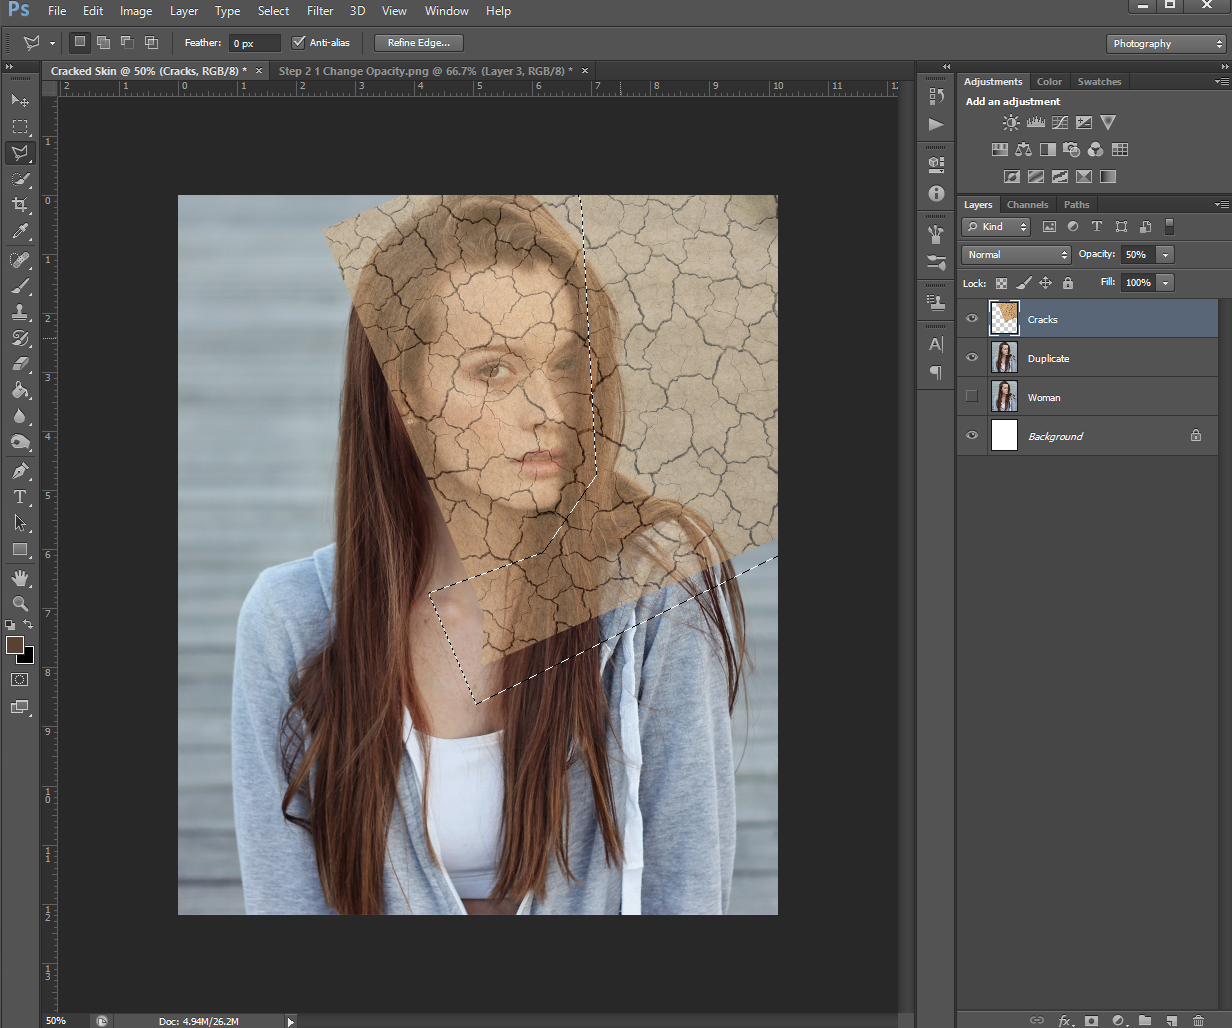
Next, using the Polygon Lasso Tool, select the parts of the cracked photo that are NOT over the face (the ones you don’t need) and then Delete them.

You can Delete your selections by hitting the Delete button on your keyboard.
You’ll also want to make sure you leave some of the texture over the hair and neck (for example) because we’ll need a bit of wiggle room to work with in the next few steps.
Step 4
Once you’ve removed most of the unneeded parts of the Cracked picture, right-click on it, and select Warp from the drop-down menu.
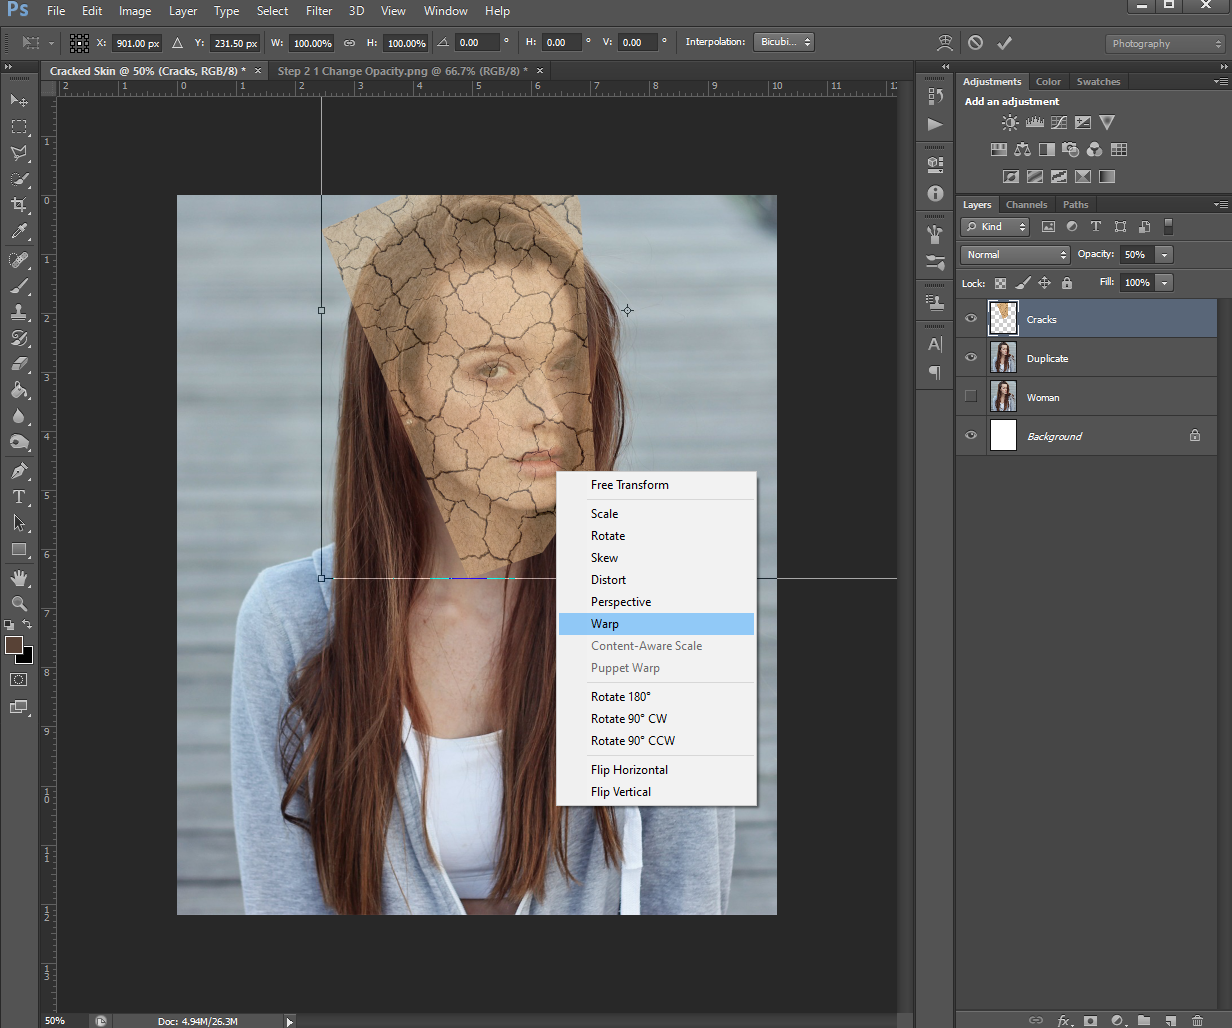
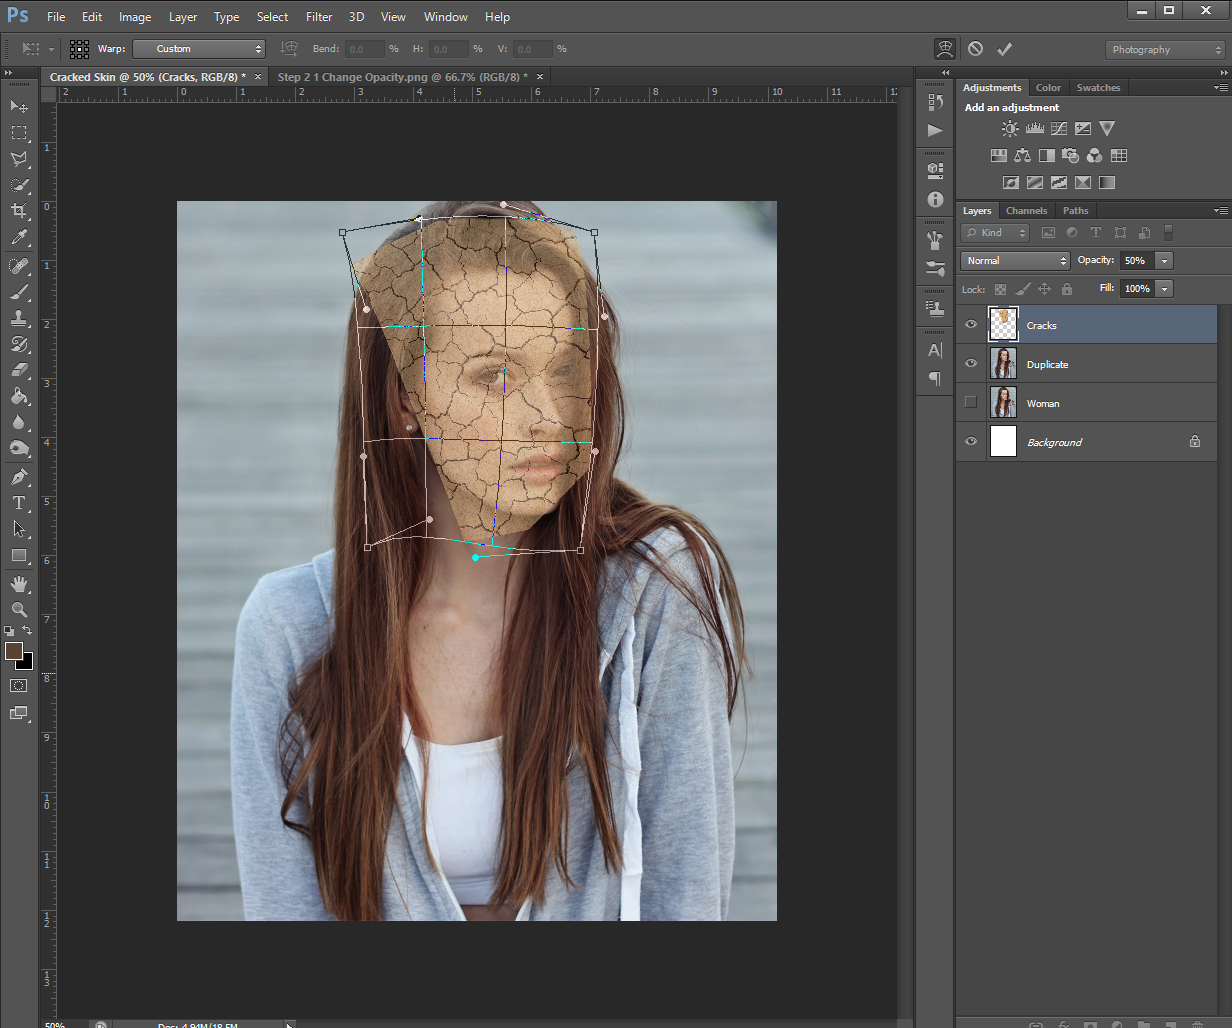
Next, Warp the Cracked layer to fit the face on the below layer. Do this part as slowly as you need to, doing a little at a time. If you warp the cracked texture too much, you may end up doing so to the point it doesn’t look good.
Once you’re happy with the amount of warping, click Enter to apply the changes.

Step 5
Bring the Opacity of the Cracked layer back up to 100% and change it’s Blending Mode to Multiply.

Step 6
Next, you’re going to create a New Adjustment Layer by going to the Adjustments box that’s on top of the Layers panel, and clicking on the Levels button.

In the Properties panel that pops up, check mark the square at the bottom (next to the eye) this will Clip to Layer. (Meaning the effects will only affect the Cracks layer, instead of the whole project)
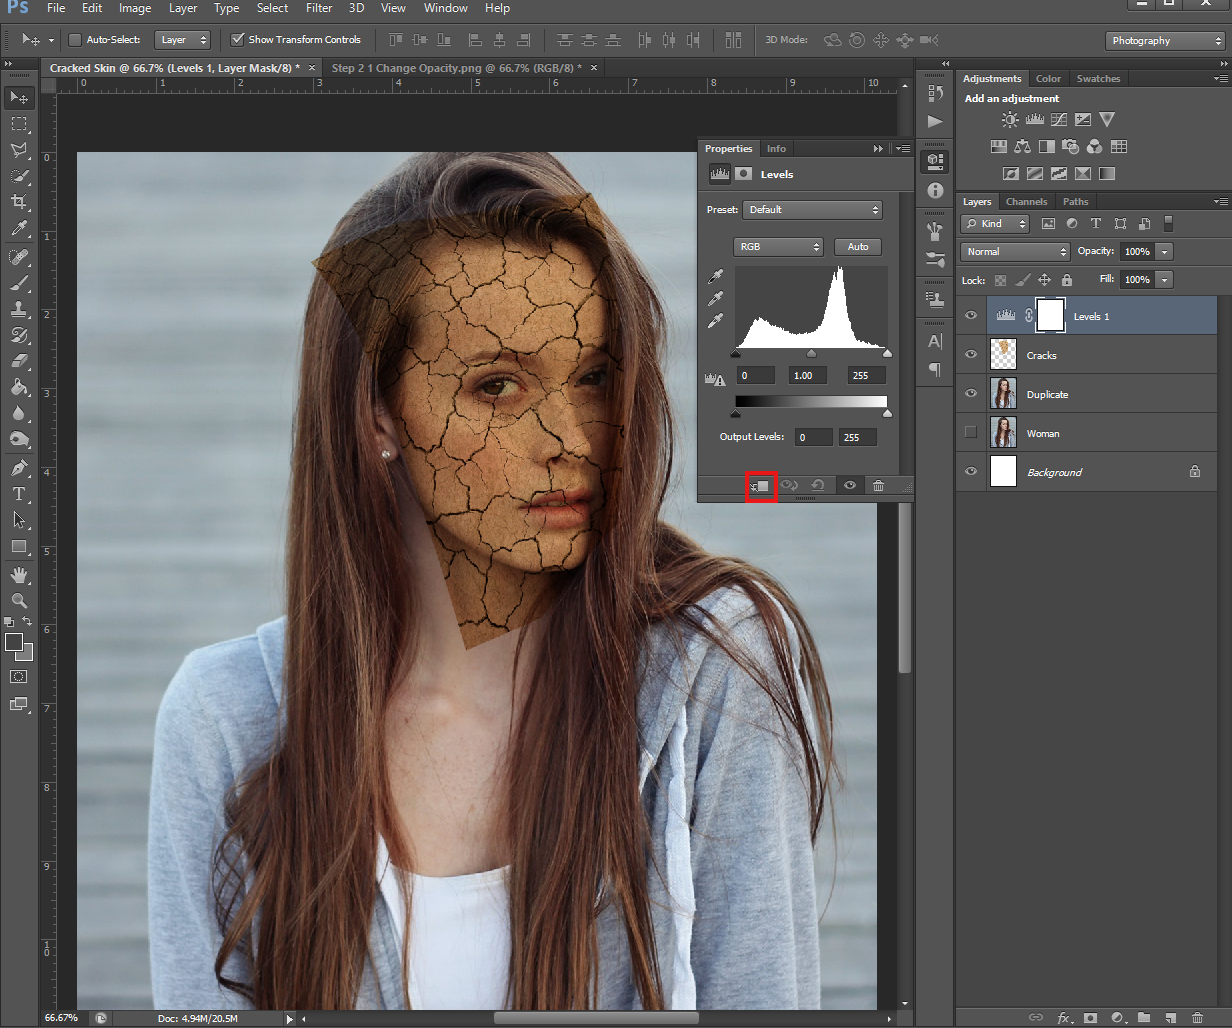
After that’s checked, drag the Midtones arrow toward the left. You’ll want to drag it until the Cracks are roughly the same shade as the skin of your person. For me, this was about 2.24.

You’ll also want to drag the Highlights arrow to the left to even out the lighting. Again, this will depend on the picture you’re using, but for me, it was 158.
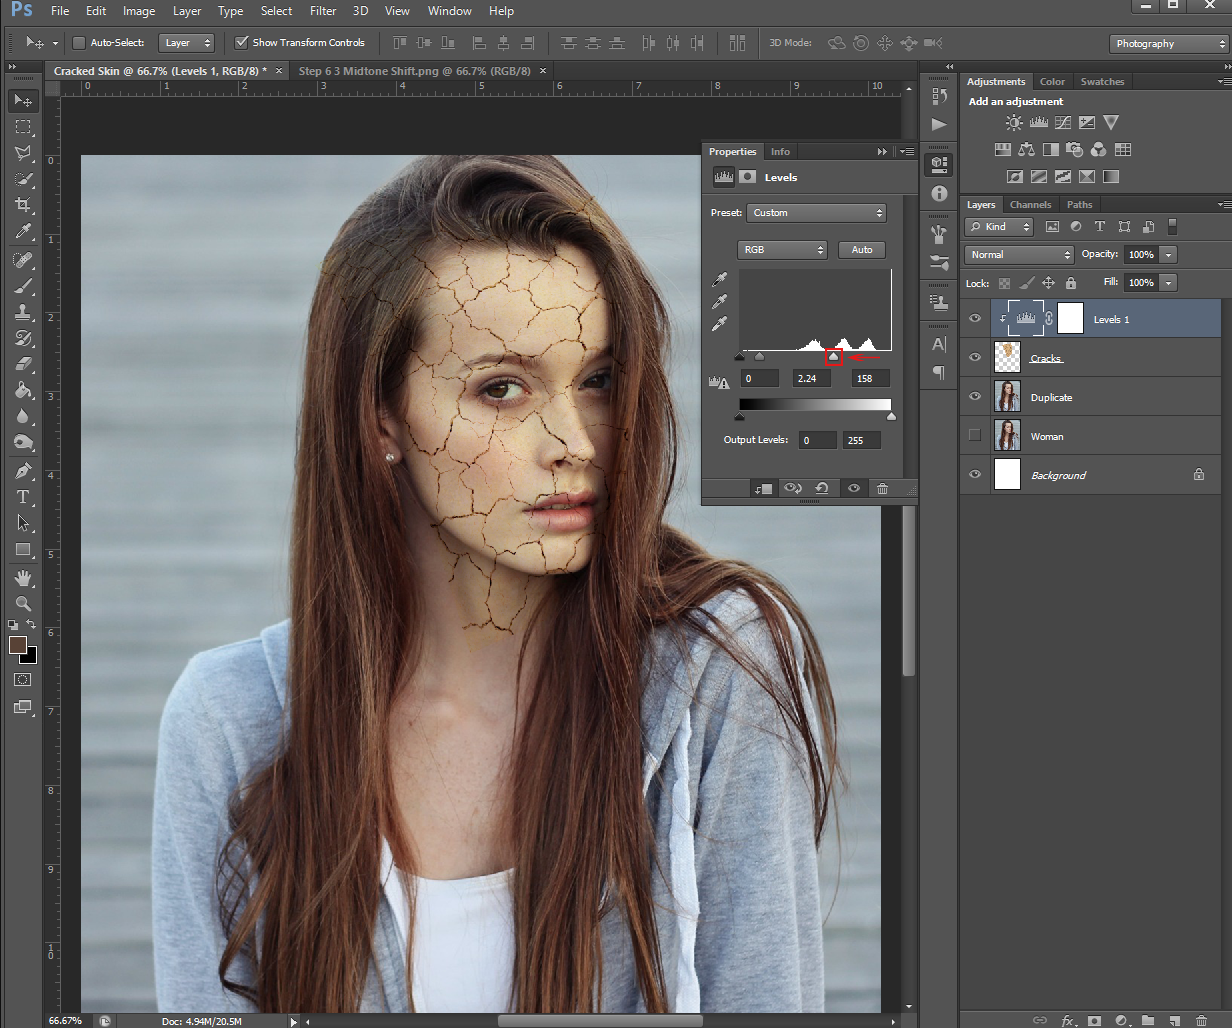
Once you’re happy with the adjustment, go ahead and close the Property panel. Do this by clicking on the double arrow at the top right corner of the box.
Step 7
Next, we’re going to create a Layer Mask for the Cracks layer. To do this, head to the bottom of the Layers Panel, and click the Layer Mask button.
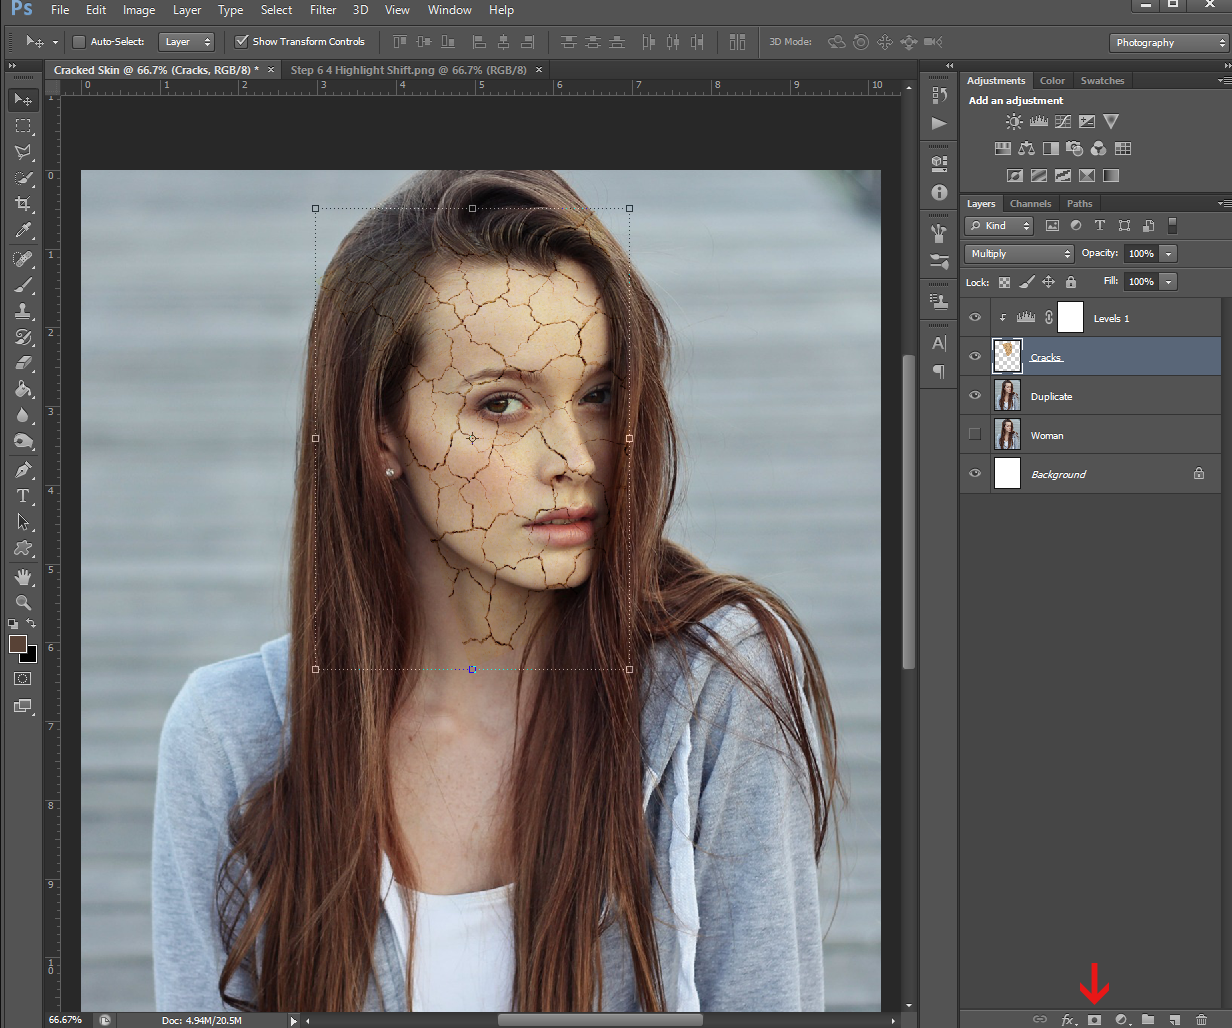
Once you have a Layer Mask, make sure your Foreground colour is set to Black, then use your Brush tool to mask the areas of the Cracks picture you don’t want. You’ll want to make sure the Brush Opacity is at 100% and the Hardness is semi-hard. (Anything over 50% Hardness would work)
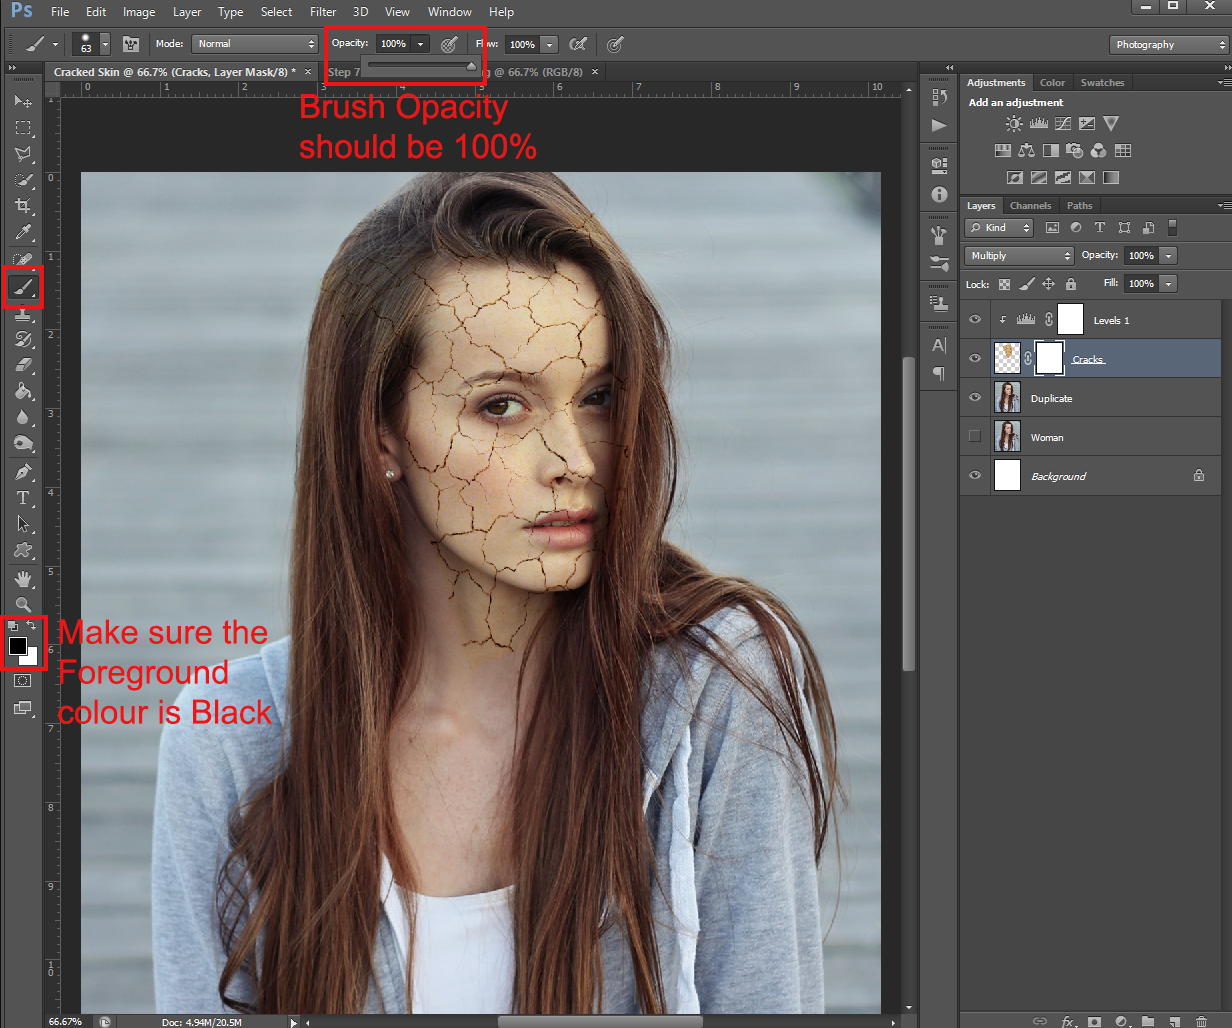
You can also use this method to get rid of extra cracks that are on the persons face. (If you feel there are too many)
Alternatively, you could just use the Eraser tool for this, but you’d have to be more careful when erasing the cracks over the face.
Step 8
After you finish that, we’re going to add another New Adjustment Layer. This time, it’ll be a Hue/Saturation layer.
Just as before, make sure the box on the bottom of the Properties panel is selected so the Hue/Saturation layer is Clipped to the Cracks layer.
You’ll want to change the Saturation to something low (mine looked best at -66) so the Cracks layer is almost indistinguishable from the skin colour of the person on the other layer.

Step 9
The next step is to Merge our layers. To do this, hold down Control on your keyboard and click on: the Duplicate, Cracks, Levels and Hue/Saturation layers, then right-click and select Merge Layers from the drop down menu.
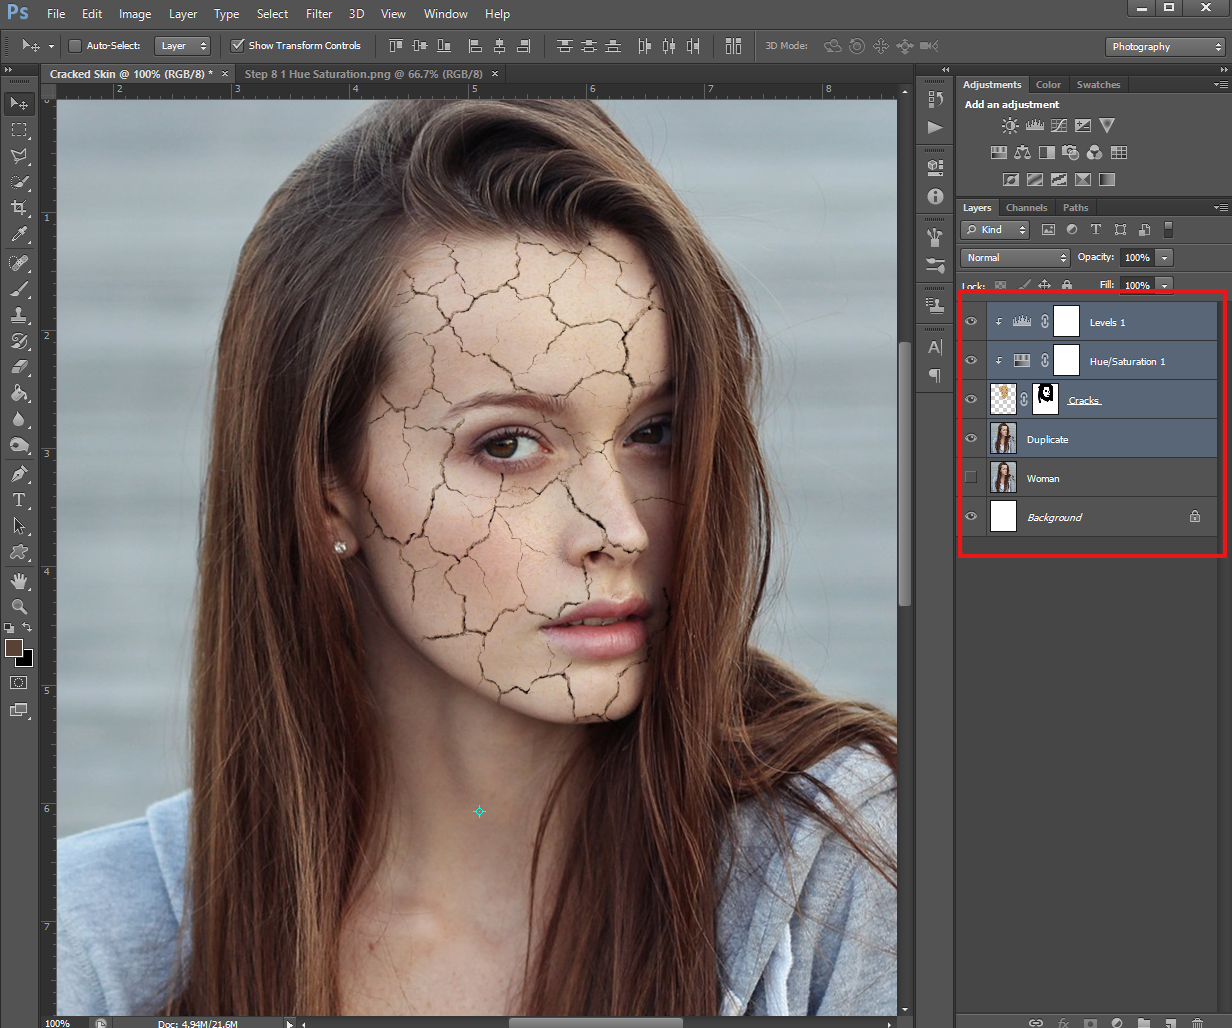

After you’ve Merged these layers, you may want to change the Layer name again so you know what it is. I went with Cracked Person, to differentiate it from the original person picture that’s still in the file. However, the name can be anything you want.

And after you’ve done that, you’re done!
You may be wondering: why did I ask you to duplicate the person picture if we didn’t end up using the original?
That’s a good question!
I can’t remember if I’ve mentioned it in past tutorials, but duplicating your “base” image is a great hack when you’re learning new PHSH skills. In case you mess up, you can just delete the duplicated (messed up) layer, and start over with the original. Keeping it in the work file allows you to keep working without having to stop what you’re doing to go digging through your cache of pictures to find it again.
Don’t forget to save a PHSH file (.psd) of your work, as well as a .jpeg/.png. That way, if you want to go back and edit or change anything (or remember what you did) you can use the PHSH file to help jog your memory.
I hope you had fun with this tutorial. The next one isn’t coming until October, so you’ll have plenty of time to practice!
Like this tutorial? Check out more here!
