Tag Archives: book tips

TV Static (PHSH Effect #32)

Loading

It’s funny, because I ended up discovering this effect during my trial and error of working out the Rain tutorial.

I didn’t think I’d end up actually making a tutorial for this effect – since I only know of one application for it – but I figured, maybe someone else out there needs to add creepy/broken-down/horror vibes to their project.

So if that’s you: you’re welcome!

Step 1

Get a picture of a television set and add it to your project.

I personally decided to go with an older looking set because I think it will help make the effect look more real, but you can use any television picture you like.

Once you’ve decided on a picture to use, create a New Layer and then fill the layer with the colour black.

Step 2

Next, go up to the top menu bar and find Filter – Noise – Add Noise from the drop down menu.

You can play with these values later, but for now, we’ll want to keep them to:

Amount of Percent 25%

Distribution Mode: Gaussian

Also make sure the Monochromatic box is checked.

Step 3

Now, we’re going to add the static to the television. There’s a couple different ways to do this, but I’ll show you the fastest way first.

Go to the Layer Opacity and change it so you can see the picture under the Noise layer, but are still somewhat able to see the Noise layer. For me, this was 40%.

Once you’ve done that, go up and use the Rectangle Select tool, then outline a rectangle shape that’s a little bigger than the screen on the television set.

Next, we’re going to right-click on the layer and select Inverse Selection from the drop-down menu. Then, you’re going to use the Eraser tool and start erasing everything outside of the box you created.

This is getting rid of the Noise that’s over the rest of the layer, and will leave us with just the Noise over the screen of the television.

Continue erasing until you’ve got everything outside of the box you created.

Step 4

To deselect the box you’ve created, go back to the Select tool, right-click and then choose the Deselect option from the drop-down that comes up.

We’re going to need to zoom in for this next part, so go ahead and zoom in until the television screen is about the only thing we can see in the document.

Now that we have a better view of what we’ll be doing, the first thing we’ll be doing now is erasing the box to fit the screen of our television better.

If yours is already pretty perfectly fit, with minimal overlap, you can skip this step.

If you need to, don’t forget you can change the size of your Eraser to make it smaller and easier to work with while being zoomed in.

Step 5

Right-click on the Noise layer and select Warp from the drop down menu.

Then, very carefully, drag the edges of the Noise layer until it appears to bend slightly into the curves of the television screen. If you chose something closer to a flat screen/modern television set, you may not need to do this step as drastically, but slightly warping the layer will still help give it an air of realism.

Once you’re happy with the Warping of your Noise layer, hit Enter on the keyboard or try to click the Pointer tool, and then in the dialogue box that pops up, select Apply changes.

Step 6

If needed, you can re-erase the edges of the Noise layer so they match up with the edges of the television screen.

If not, go ahead and you change the Opacity of the Noise layer back to 100%.

If you want a subtler static on the television, you can keep the Opacity lower. Depending on why you’re adding the static, you can even keep it semi-see through, and add a picture to the screen, so it looks like it’s a bad connection, instead of just being completely out.

Once you decide you’re happy with whatever you decide, you can go ahead and save this bad boy because we are done!


Like this tutorial? Check out the rest of the series here!

Carved (PHSH Effect #4)

Loading

This month, we’ll be keeping with the word effects, and I’m going to show you how to make a carved/chiselled effect on wood, metal or concrete.

There’s two ways I’ve found to do this, so I’ll be showing you both. They both take roughly the same amount of skill, but one of them works better for making the words looked carved into a variety of backgrounds, and the other is more specific to the three backgrounds listed above.

AterImber.com - Writing - Writing Tips - PHSH Effect Series - Carved Effect - Carved Effect Finsihed Wood - phsh effect, writing tips, book cover tips, indie author tips, self pub tips

This is the first way, which looks best on either a wood, metal or concrete background, using the Times New Roman or another similar font.

This is the second way to do it, and as you can see, it easily works on a non-wood, metal or concrete background, and doesn’t need to be done using the Times New Roman font.

Way #1:

Step 1. Get a metal/wood/concrete background. You can do so by either finding one on a royalty-free image site (such as Pixabay.com) or, you can right-click and save the two pictures below to use as the background for this tutorial.

AterImber.com - Writing - Writing Tips - PHSH Effect Series - Carved Effect - Way 1 Wood - phsh effect, writing tips, book cover tips, indie author tips, self pub tips

AterImber.com - Writing - Writing Tips - PHSH Effect Series - Carved Effect - Way 1 Teal Metal - phsh effect, writing tips, book cover tips, indie author tips, self pub tips

AterImber.com - Writing - Writing Tips - PHSH Effect Series - Carved Effect - Way 1 Concrete - phsh effect, writing tips, book cover tips, indie author tips, self pub tips

Step 2: Once you have the pictures, open PHSH and make a new document. Drag the pictures to your work document and resize if necessary. Once that’s done, type a phrase or sentence you want to change. For the purposes of this tutorial, I’ll just use ‘Carved’. Also, to keep things simple, I’m just going to use the Times New Roman font, and made it 150pt size. (My canvas size is roughly 25cm x 17cm)

AterImber.com - Writing - Writing Tips - PHSH Effect Series - Carved Effect - Way 1 Background w Carved - phsh effect, writing tips, book cover tips, indie author tips, self pub tips

With this way to do it, you’ll want to make sure that your font colour is just plain black.

Step 3: Right-click on the Type layer (‘carved’ word) and go to the Blending Options.

AterImber.com - Writing - Writing Tips - PHSH Effect Series - Carved Effect - Way 1 Right-Clicked Blending Options - phsh effect, writing tips, book cover tips, indie author tips, self pub tips

In the Default Blending Options (the panel that opens right when you click on it), go to Blend Mode, and select Screen from the drop-down menu.

AterImber.com - Writing - Writing Tips - PHSH Effect Series - Carved Effect - Way 1 Blending Options Screen - phsh effect, writing tips, book cover tips, indie author tips, self pub tips

AterImber.com - Writing - Writing Tips - PHSH Effect Series - Carved Effect - Way 1 Blending Options Screen Selected - phsh effect, writing tips, book cover tips, indie author tips, self pub tips

Step 4: Once you select Screen, you’ll notice the word disappeared. Don’t freak out, it’s still there (as evidenced in the Layers panel), we just can’t see it right now.

Next, go to Bevel and Emboss, and copy the values listed below:

  • Style: Outer Bevel
  • Technique: Chisel Hard
  • Depth: 200%
  • Size: 12 (or 6 depending on how the finished product looks)
  • Angle: -45, 30 (be sure to uncheck the Use Global Light box)
  • Highlight Mode: Overlay, Opacity: 100
  • Shadow Mode: Multiply, Opacity: 75

AterImber.com - Writing - Writing Tips - PHSH Effect Series - Carved Effect - Way 1 Bevel & Emboss Complete - phsh effect, writing tips, book cover tips, indie author tips, self pub tips

Step 5: Once you’ve got that all changed, then go down the left-side list to Inner Shadow, and input these values:

  • Blend Mode: Multiply
  • Opacity: 100%
  • Angle: 120 (uncheck Use Global Light)
  • Distance: 16
  • Choke: 16
  • Size: 12

AterImber.com - Writing - Writing Tips - PHSH Effect Series - Carved Effect - Way 1 Inner Shadow Complete - phsh effect, writing tips, book cover tips, indie author tips, self pub tips

Once that’s done, go down the list again to Colour Overlay, and apply these values:

  • Black
  • Blend Mode: Overlay
  • Opacity: 55

AterImber.com - Writing - Writing Tips - PHSH Effect Series - Carved Effect - Way 1 Colour Overlay Complete - phsh effect, writing tips, book cover tips, indie author tips, self pub tips

Once you’re done applying all three of those effects, click Okay to apply them to the Layer.

You should notice the text changing while applying each of those effects, and once you apply the Colour Overlay, you should notice the word now looks like it’s carved into the wood.

And that’s it for this way! You can press on the Eye symbol in the Layers panel that’s next to each Layer, so you can see the effect on the teal metal and the concrete backgrounds.

AterImber.com - Writing - Writing Tips - PHSH Effect Series - Carved Effect - Way 1 Carved Effect Done Teal - phsh effect, writing tips, book cover tips, indie author tips, self pub tips

AterImber.com - Writing - Writing Tips - PHSH Effect Series - Carved Effect - Way 1 Carved Effect Done Concrete - phsh effect, writing tips, book cover tips, indie author tips, self pub tips

Now that I’ve shown you how to do that way, I’ll show you how to do it the second way below. Be sure to save the above work so you don’t lose it!

Way #2

Step 1: Open a fresh document, and drag and drop any other background you want to use. (This time it doesn’t have to be a wood/metal or concrete picture) For this one, I’ll use a room with wallpaper and a chalkboard.

AterImber.com - Writing - Writing Tips - PHSH Effect Series - Carved Effect - Way 2 Blank Dingy Room - phsh effect, writing tips, book cover tips, indie author tips, self pub tips

AterImber.com - Writing - Writing Tips - PHSH Effect Series - Carved Effect - Way 2 Blank Chalkboard - phsh effect, writing tips, book cover tips, indie author tips, self pub tips

Step 2: Type the word/phrase you want to use. Again, I’ll just be using ‘carved’ for the tutorial.

AterImber.com - Writing - Writing Tips - PHSH Effect Series - Carved Effect - Way 2 Carved Dingy Room No Change - phsh effect, writing tips, book cover tips, indie author tips, self pub tips

Step 3: This time, go to Fill, which is in the top of the Layers panel, and change it to 0%.

AterImber.com - Writing - Writing Tips - PHSH Effect Series - Carved Effect - Way 2 Fill Red Box - phsh effect, writing tips, book cover tips, indie author tips, self pub tips

AterImber.com - Writing - Writing Tips - PHSH Effect Series - Carved Effect - Way 2 Fill 0% - phsh effect, writing tips, book cover tips, indie author tips, self pub tips

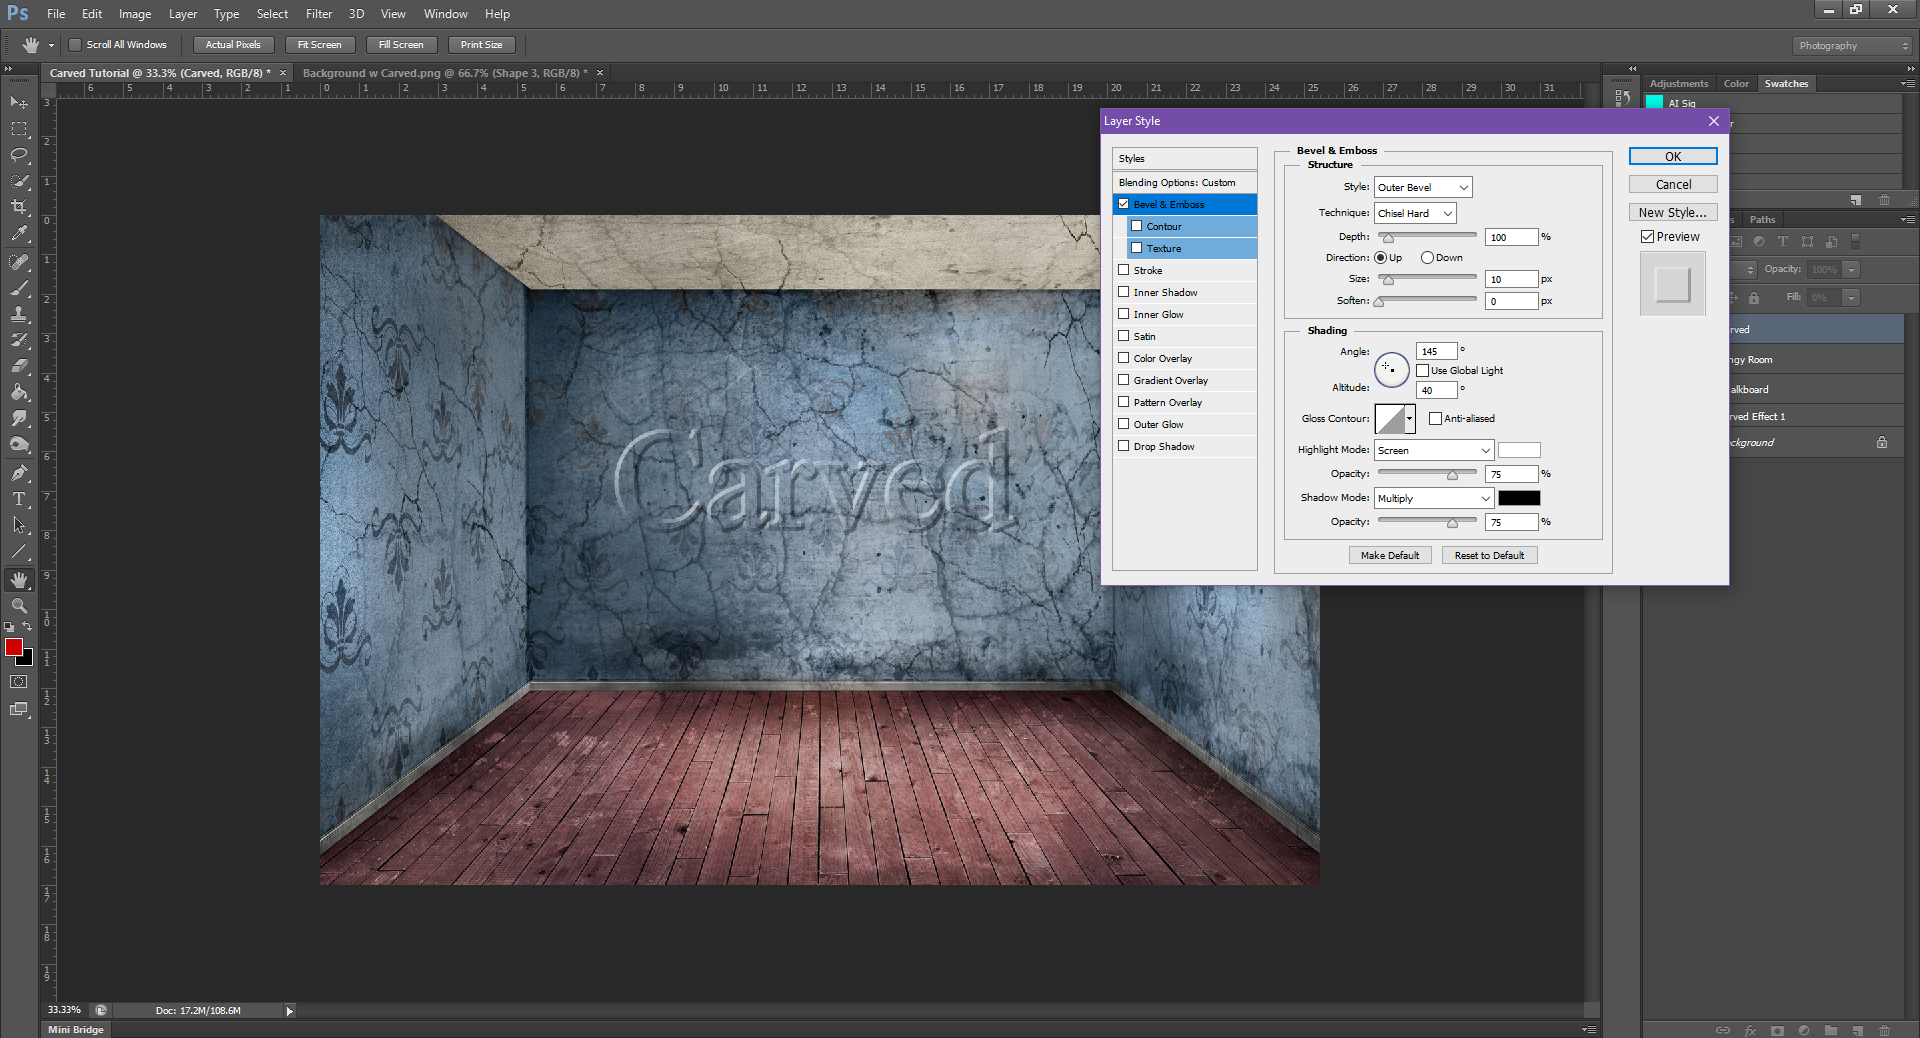
Step 3: Now, we’ll be going back to the Blending Options, and back to Bevel and Emboss. Change the values to:

  • Style: Outer Bevel
  • Technique: Chisel Hard
  • Depth: 100%
  • Direction: Up
  • Size: 10, Soften: 0
  • Angle: 145, 40 Degrees (Uncheck Use Global Light)
  • Highlight Mode: Screen, Opacity: 75%
  • Shadow Mode: Multiply, Opacity: 75%

AterImber.com - Writing - Writing Tips - PHSH Effect Series - Carved Effect - Way 2 Bevel & Emboss - phsh effect, writing tips, book cover tips, indie author tips, self pub tips

Now go back down to Inner Shadow:

  • Blend Mode: Multiply (Black), Opacity: 90%
  • Angle: 145 Degrees (Uncheck Use Global Light)
  • Distance: 15, Choke: 30, Size: 15

AterImber.com - Writing - Writing Tips - PHSH Effect Series - Carved Effect - Way 2 Inner Shadow - phsh effect, writing tips, book cover tips, indie author tips, self pub tips

And lastly, back down to Colour Overlay:

  • Blend Mode: Soft Light
  • Colour: Black
  • Opacity: 75%

AterImber.com - Writing - Writing Tips - PHSH Effect Series - Carved Effect - Way 2 Colour Overlay - phsh effect, writing tips, book cover tips, indie author tips, self pub tips

Once you’re done that, click Okay to apply the effects. Don’t forget to save your work!

As they are now, both these effects look pretty much the same. The one (big) difference here, is the first way tends to not look right if you try to use a font that’s not close in nature to Times New Roman, and doesn’t work that well if you change the font colour from black.

This second way works for a myriad of different fonts and colours. It’s also faster to do, which can help save you time so you’re not spending too much time on one effect.

Another thing I’ve found works best using the second way, is changing the colour used in the Colour Overlay.

For example:

AterImber.com - Writing - Writing Tips - PHSH Effect Series - Carved Effect - Way 2 Carved Chalkboard - phsh effect, writing tips, book cover tips, indie author tips, self pub tips

Looks fine on the chalkboard background, too. Although we’d need to rotate the text to make it match.

AterImber.com - Writing - Book Posters - The Haunted Corpse - Help Me Poster

Here, I used way #2, but instead of using black for the Colour Overlay, I used red – giving the poster a bit more of a morbid feel by making the words look like they have blood in the dents.

Feel free to play around with different colours, angles to see which combination works well for what you need. Also, a quick side note: the Distance/Choke/Size values will most likely vary depending on the size of your font. Don’t be afraid to play around to see how the effect will look in different situations.

As always, don’t forget to save your work as either (or both) a PSD and/or PNG file. I’d hate to have you get the effect just right and then lose all that hard work because you forgot to save it!

Next time I’ll show you how to give a picture a transparent background. Keep your eye out for that July 29th.


Like this tutorial? Check out more here!

Liking the site? Consider signing up for my Patreon, so I can continue bringing you the content you love!