![]()
In this month’s tutorial, I’m going to show you how to make water.
From scratch.

It may seem impossible, but don’t worry – I’m not talking miracles. This tutorial is a little harder than some of the previous ones, but as long as you follow through the steps (and practice) you shouldn’t have any problems creating water from nothing.
No resurrections required.
Step 1
Create a blank PHSH work document. Yep, we’re not going to be using a picture for this one!

Step 2
Create a New Layer, then call the layer Water Surface.

Make sure your Foreground Colour is white, and the Background Colour is black. Also make sure your new layer is white, and not transparent. If the layer is automatically transparent upon creation, don’t worry! You can use the Paint Bucket and dump the white foreground colour onto the layer.
Step 3
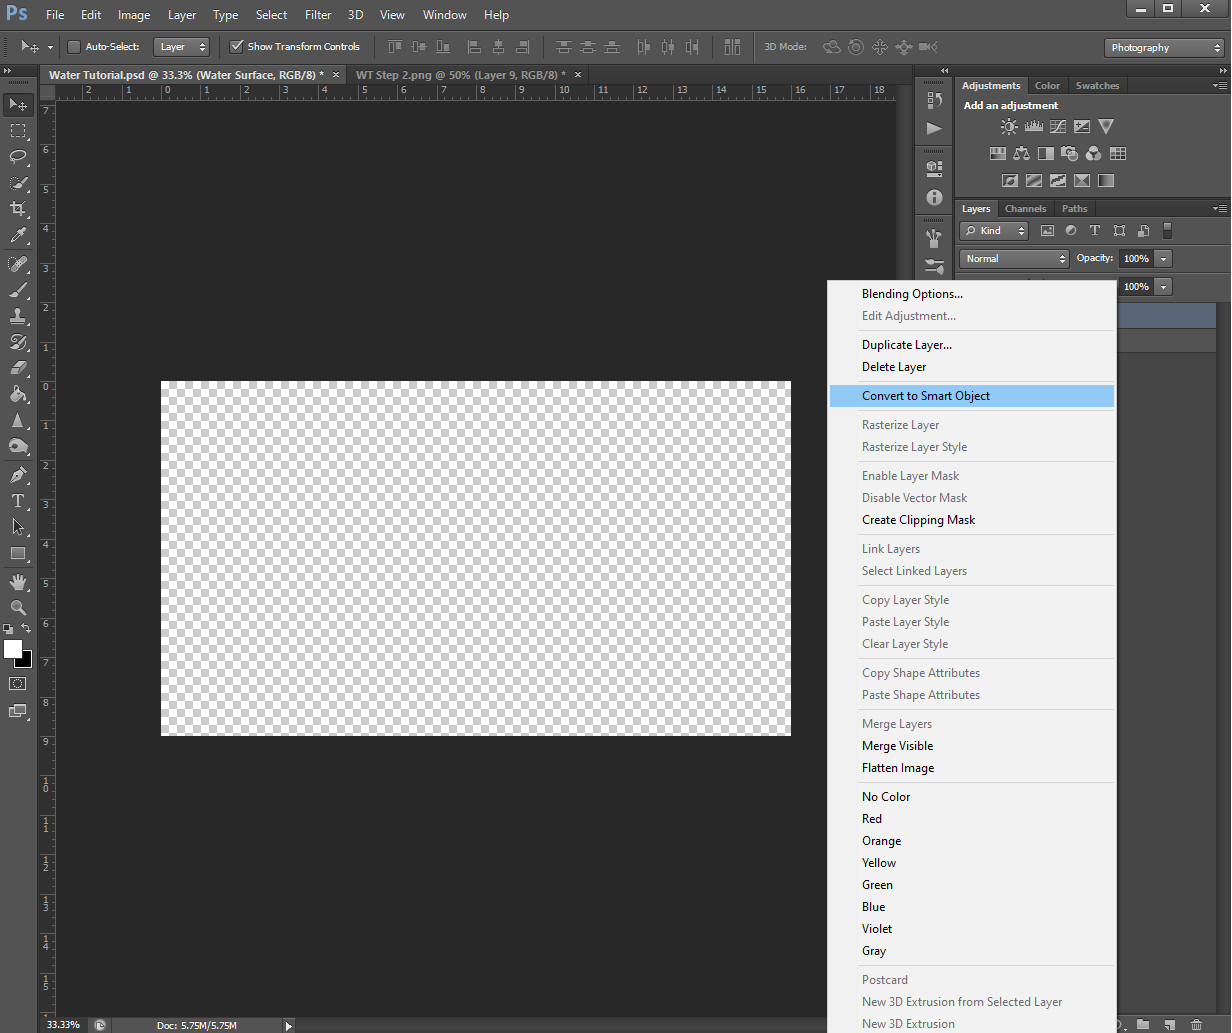
Next, right-click on the layer and Convert to Smart Object.
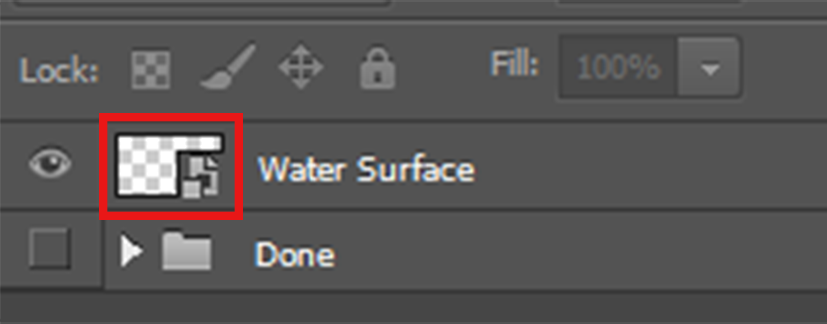
You’ll know the Layer is a Smart Object when this symbol appears in the corner.
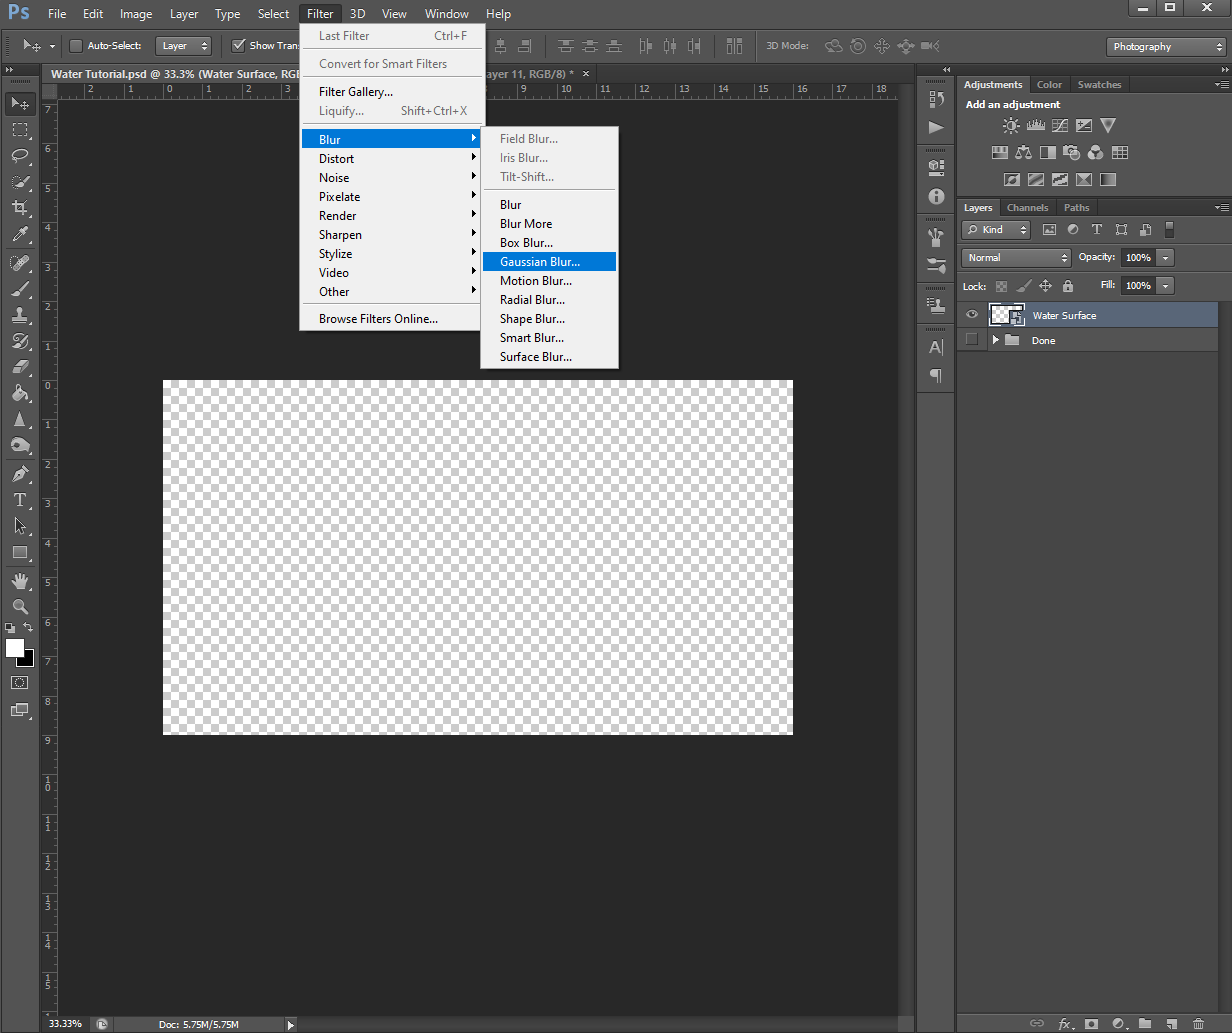
Once the layer’s a Smart Object, go up to the top menu and go to Filter – Blur, then choose Gaussian Blur. The Radius size should be 5.0.

Step 4
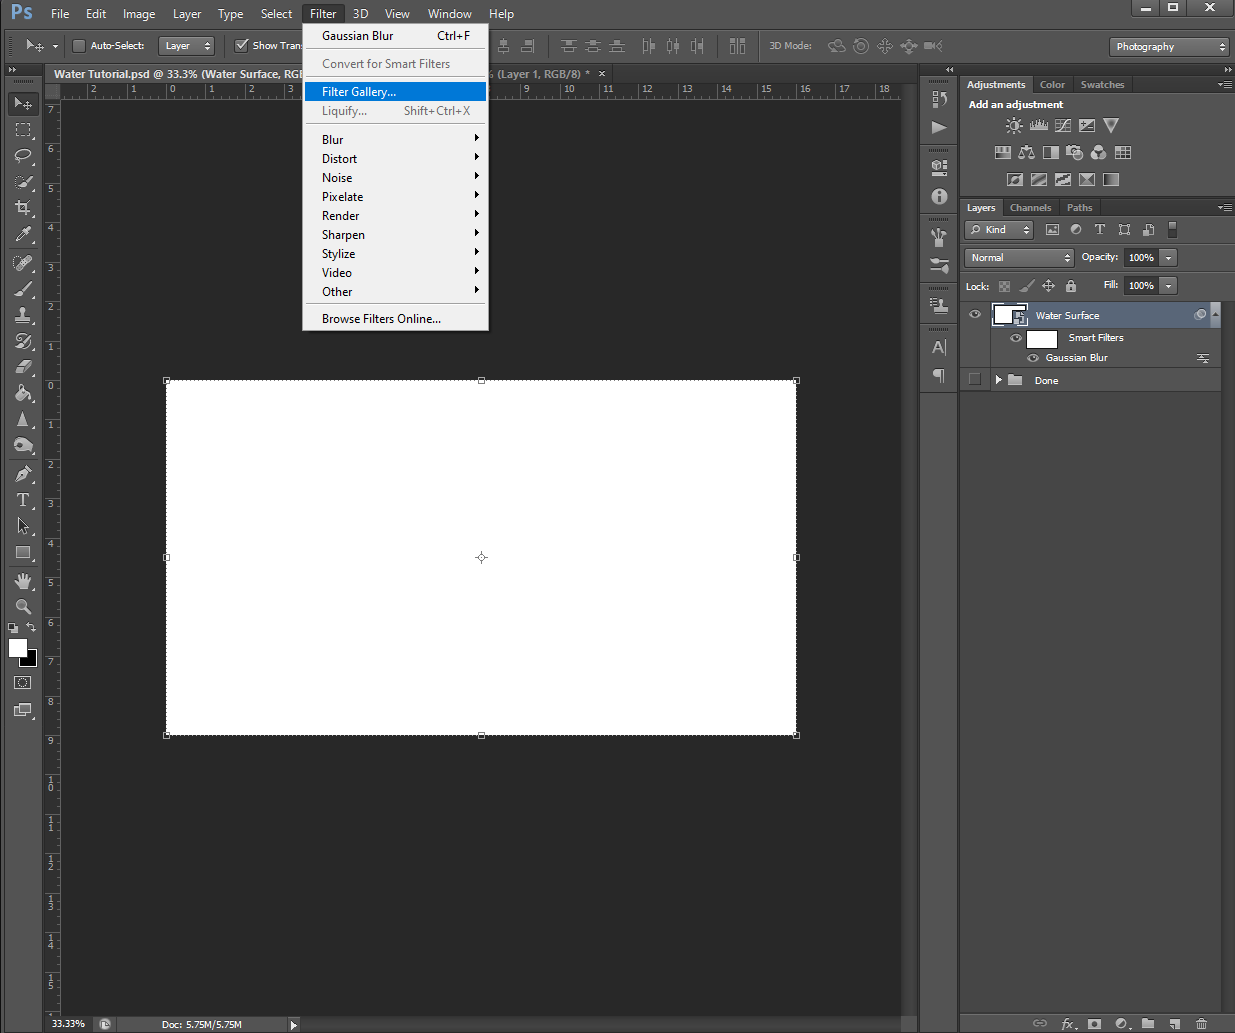
Next, go back up to Filter and this time, click on Sketch, then choose Chalk and Charcoal from the list. If you don’t see Sketch in the drop-down menu (like mine), click on Filter Gallery, then Sketch.

On the right-hand side, the values for the Chalk & Charcoal effect should be as follows:
Charcoal Area: 6
Chalk Area: 6
Stroke Pressure: 1
Once the values are correct, click the Okay button to apply the effect.
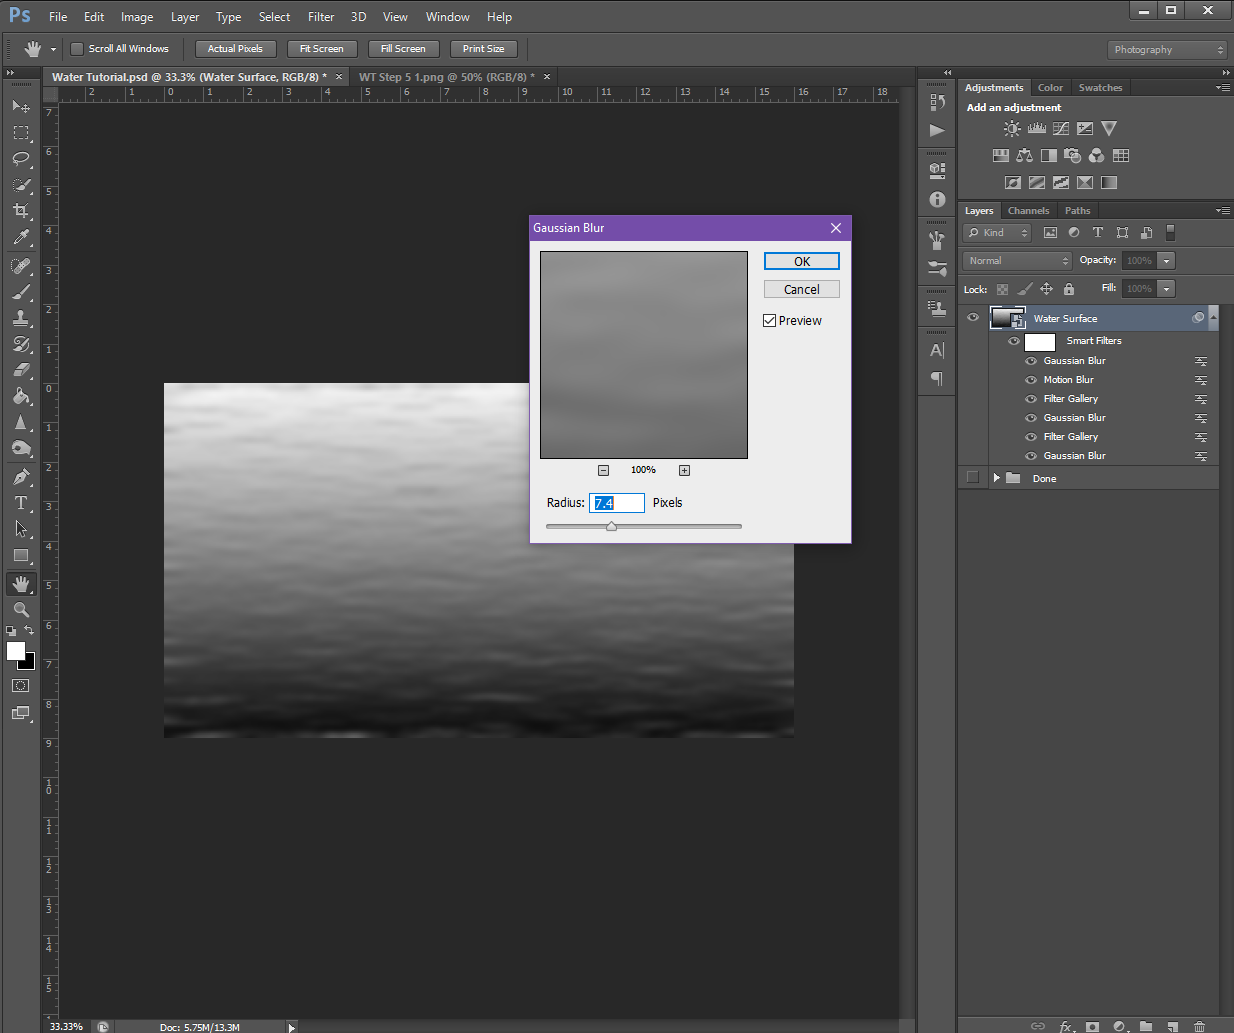
After applying Chalk & Charcoal, you’re going to add a 2nd Gaussian Blur, and make this one’s Radius 7.4.

Step 5
Now that we’ve got the base done, we can start to make this actually look like water!
To begin the waterfication process, we’re going to add some ripples. To this, go back to the Filter Gallery, Sketch menu and this time, we’re going to use Bas Relief.

For the Bas Relief, make sure the values are as follows:
Detail: 2
Smoothness: 2
Light: Bottom
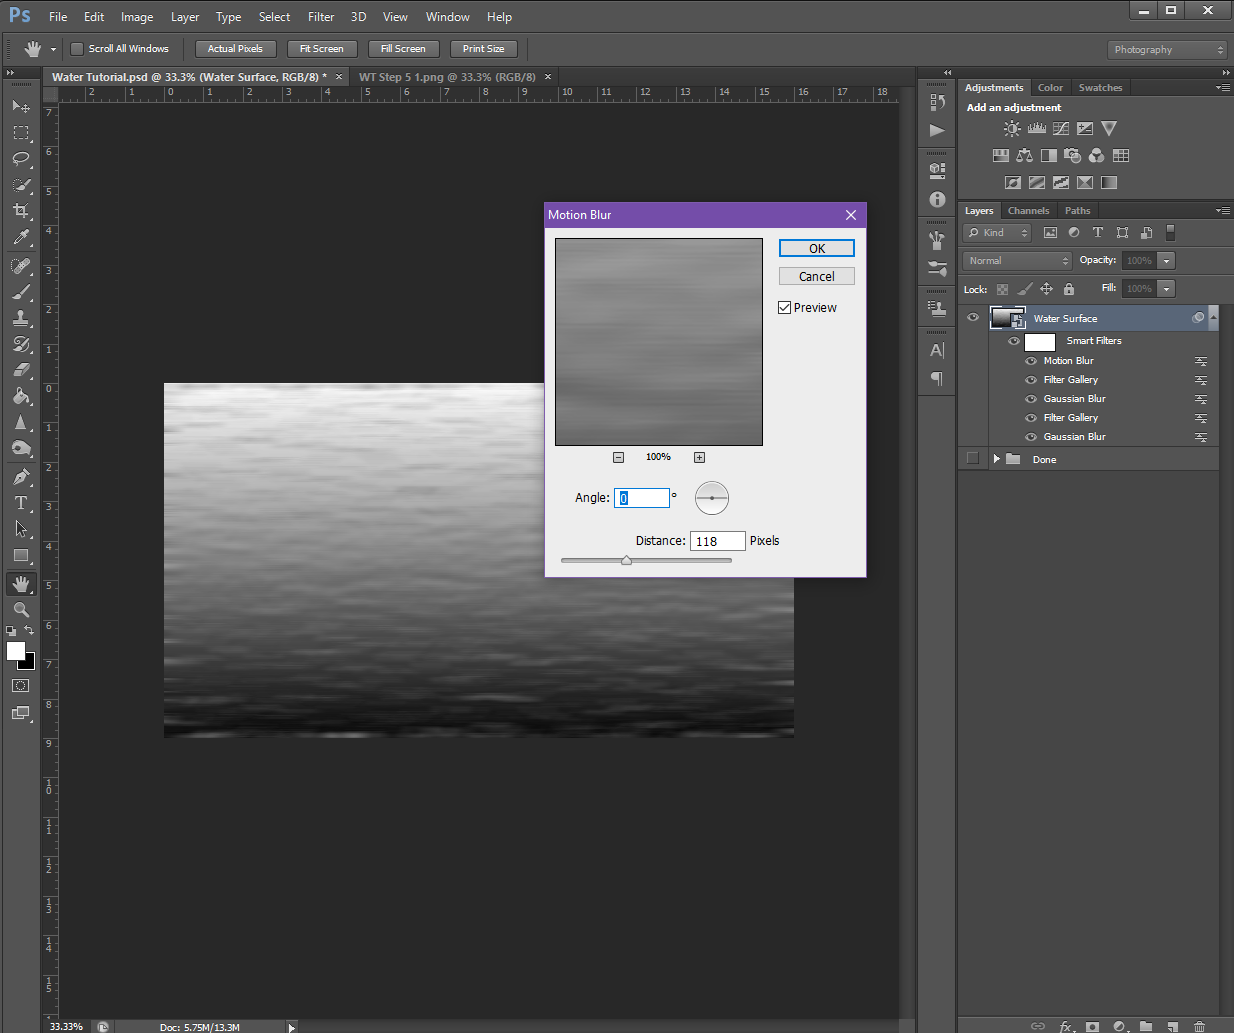
Once you’ve added the ripples, we’re going to go back up to Filter – Blur and add a Motion Blur.
For the Motion Blur, the values it should be:
Angle: 0
Distance: 118
We’re also going to add one more Gaussian Blur, with the same value as before (7.4).
Step 6
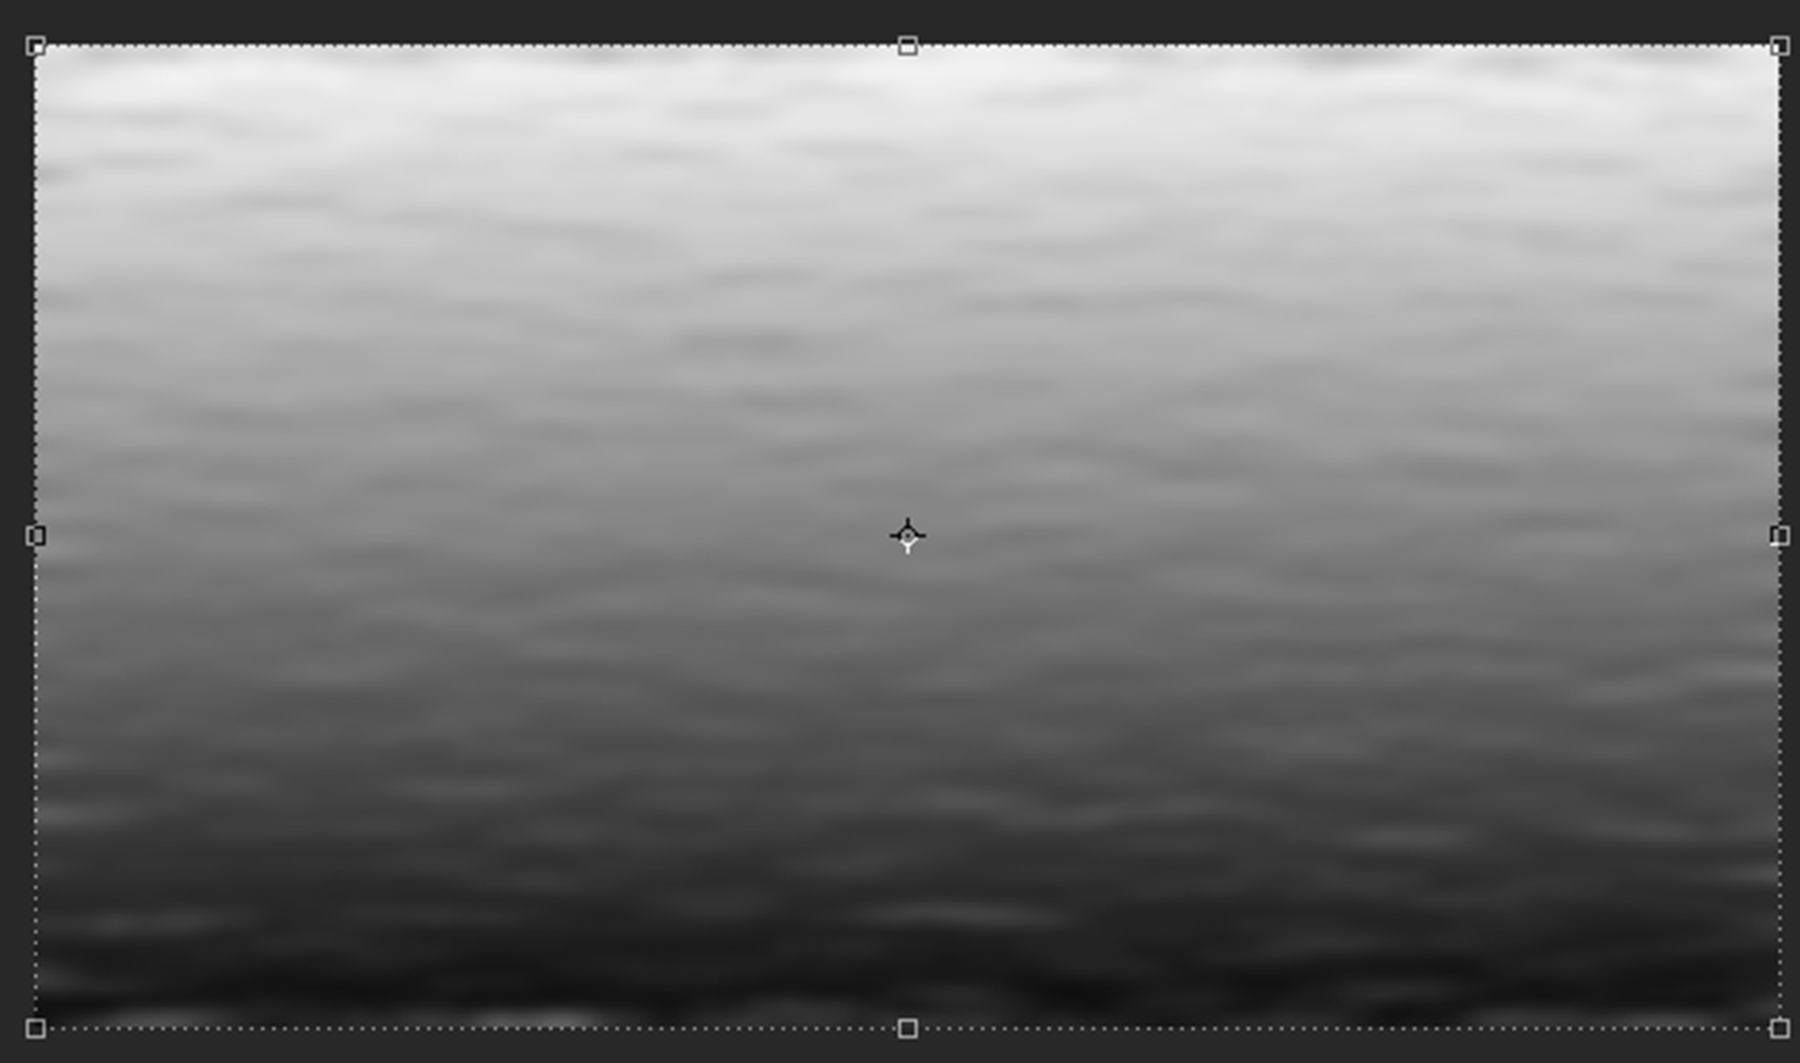
Hopefully by now you’re starting see the water take shape. Which is good, because the next step is to turn it water colour!
To do this, we’re going to add a Gradient Map. You can do this one of two ways.
The first way is to create a New Fill Layer by using the option at the bottom of the Layers panel.
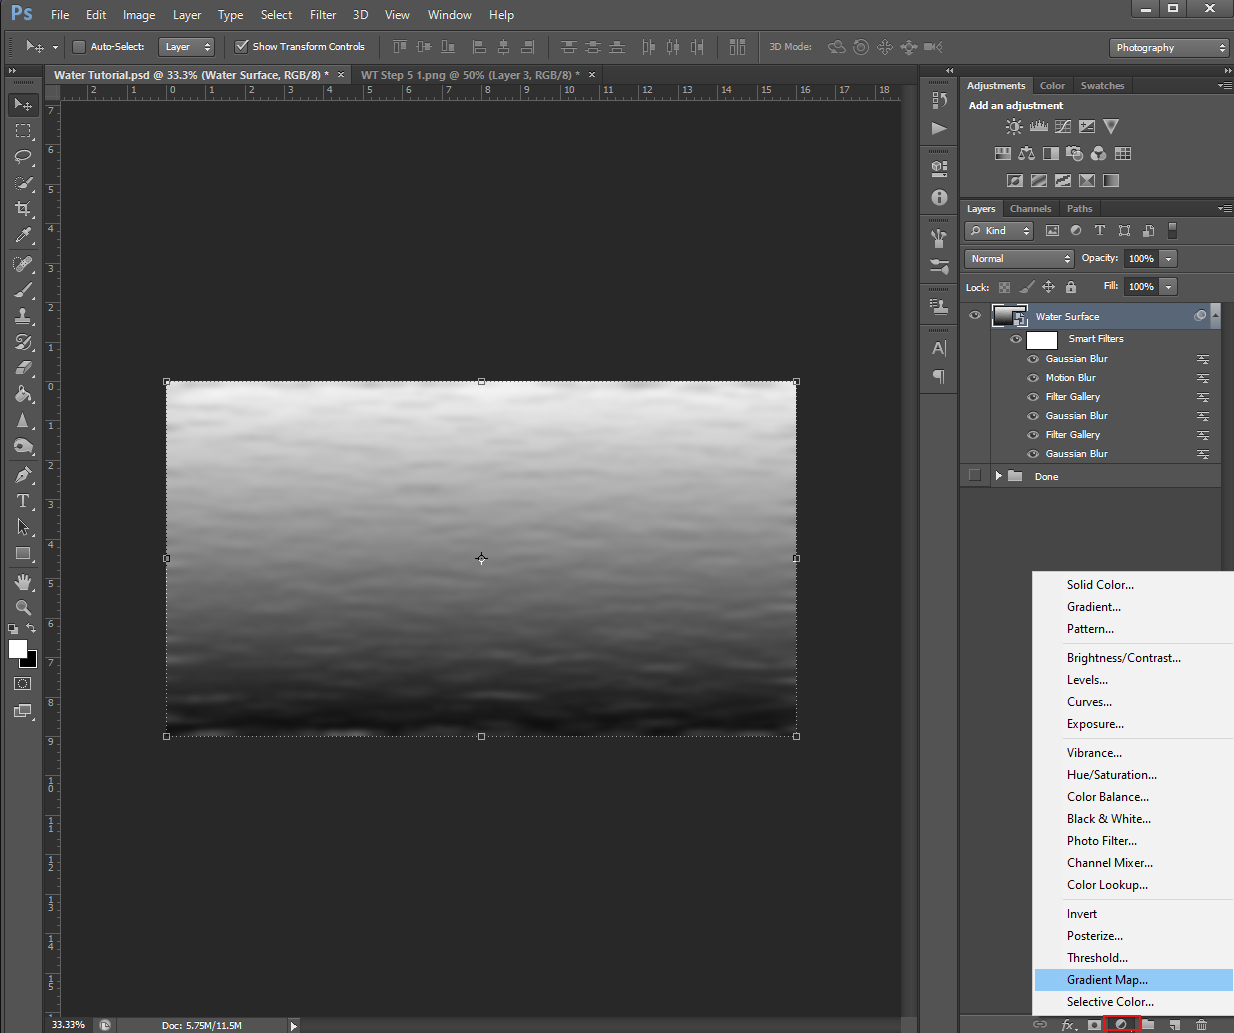
Once the Gradient Map Properties panel opens, double click on the Gradient to bring up the Gradient Editor. From here, you’re going to change the white and black colours to the following two blues.
Light: #5394b9
Dark: #18548b
To change the colours to the above, click on the little arrow (called a Colour Stop), then double click on the colour in the below Stops menu. This will bring up the Colour Picker, and allow you to input one of the two blue colours.
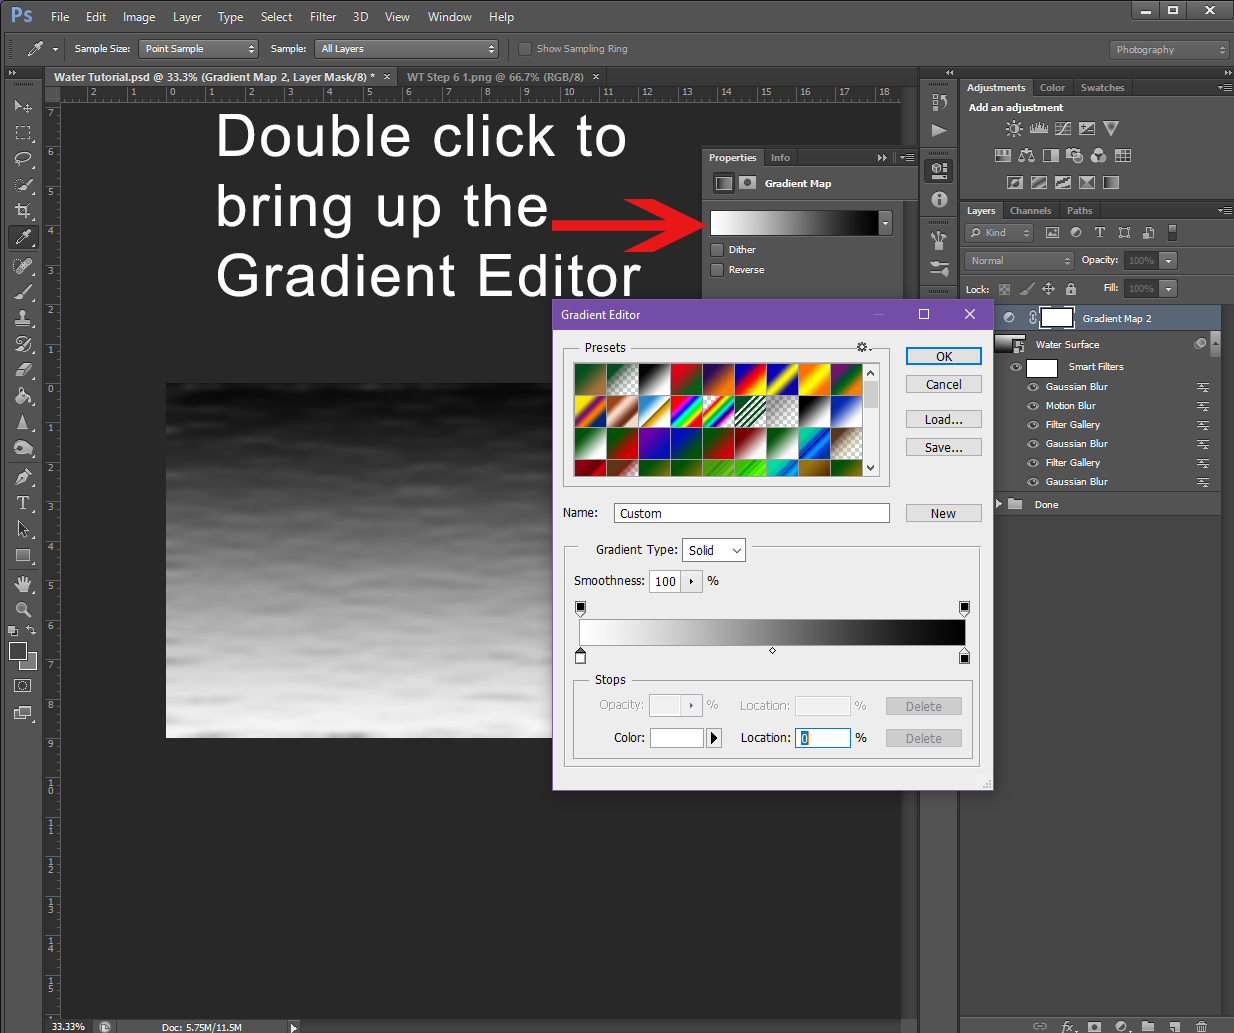 Gradient Editor
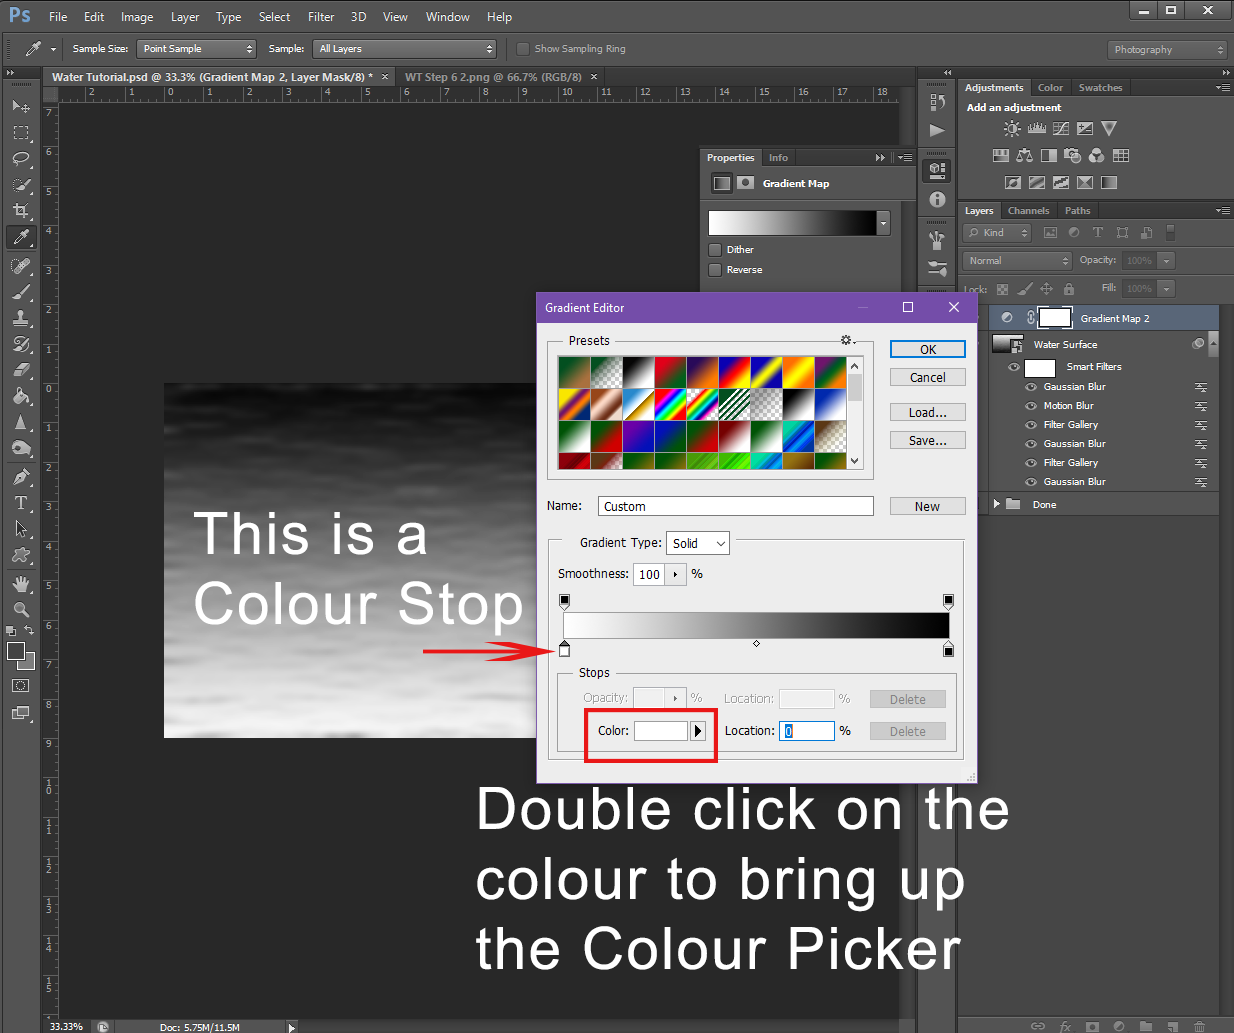 Double click Colour Stop to bring up Colour Picker
Once you’re in the Colour Picker you can copy/paste the above numbers into the # bar to get the correct colours. Then click Okay to make the colour change take affect.
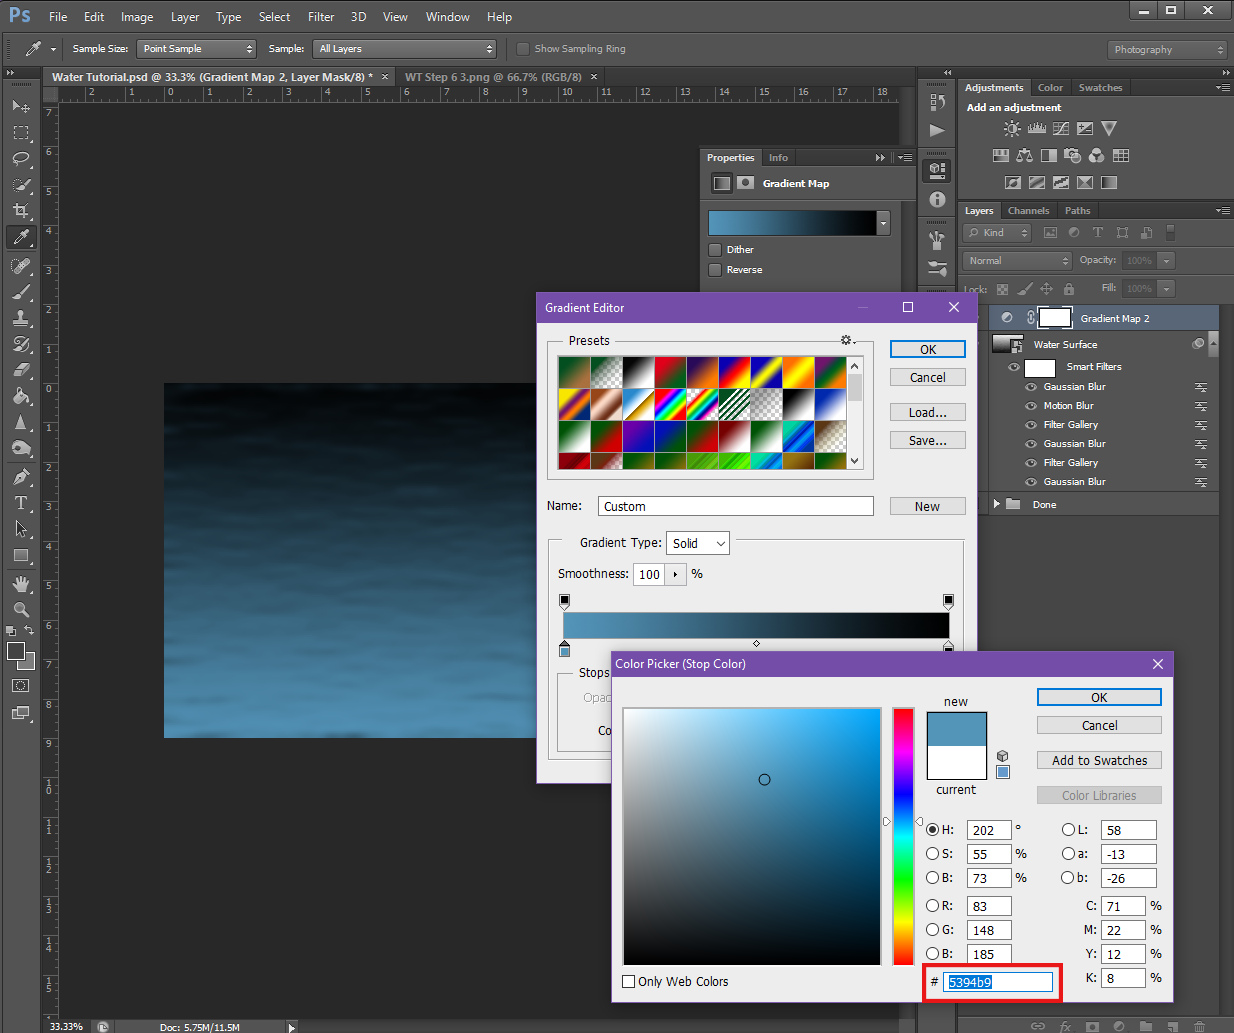
Copy/paste the # values into the box in the Colour Picker
Make sure to this for both colours. Once done, you can click Okay in the Gradient Editor for the change to take affect or you can save this Gradient into your presets by giving it a name.
This will allow you to easily add this gradient to future projects without having to add the colours manually.
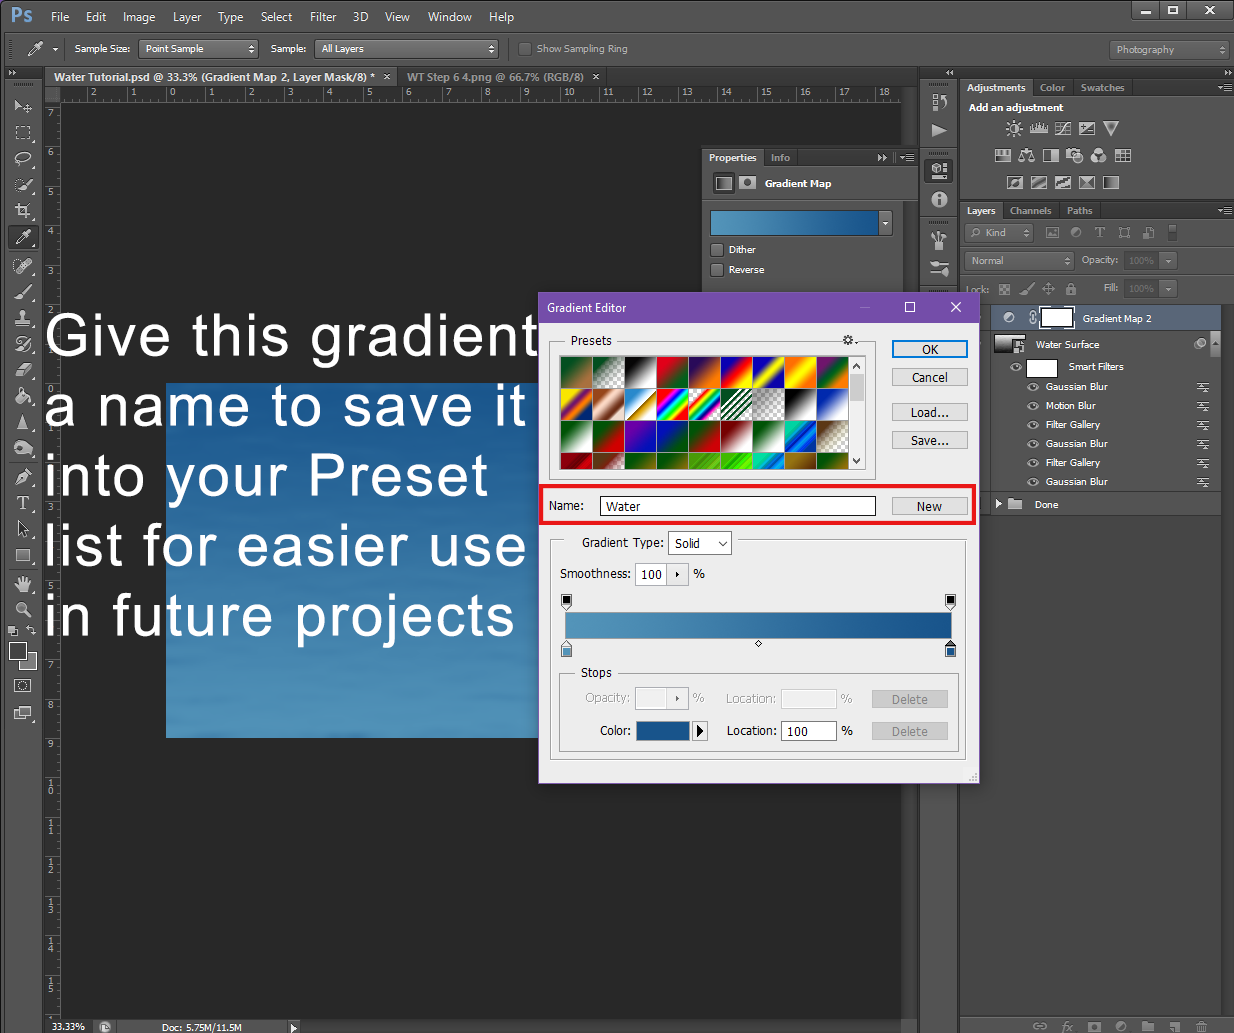
If the darker blue is at the top of the gradient instead of the bottom, you can either manually change the colours again so the dark blue is the first Colour Stop on the gradient or, you can check the little Reverse button in the Gradient Map Properties panel.
Whether or not the dark blue is on the top will depend on what you’re adding this Water effect to. The lighter shade of blue is to represent the direction the light is coming from.
Step 7
This is looking pretty good, and again, depending on the picture you’re using this water could be done. But, if you’d like to make it look a bit more realistic, we can add some ‘sun’ highlights.
To do this, you’ll need to create a New Layer and call it Water Texture. Just like with the Water Surface layer, you’ll be filling this layer with white, then converting to a Smart Object.
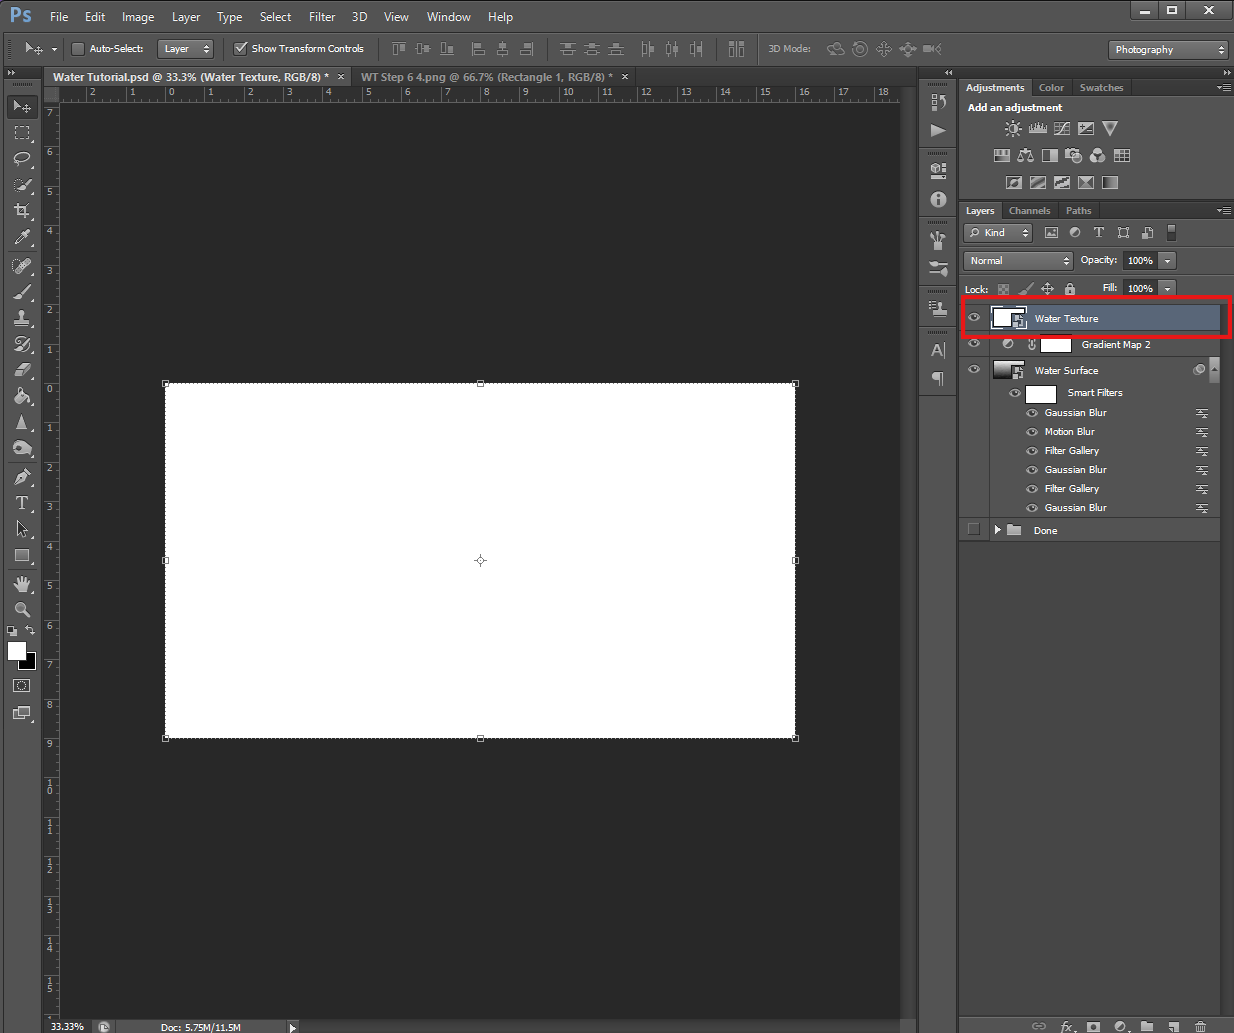
Step 8
We’re going to add some Noise to the Water Texture layer now, so go on up to Filter – Noise – Add Noise. Make sure the values for Add Noise are 73.02% and Uniform.

Next, we’re heading back to the Filter Gallery for more Sketch fun! This time, we’re going to select Halftone Pattern from the Sketch menu. The values for Halftone Pattern should be:
Size: 1
Contrast: 50
Pattern Type: Dot
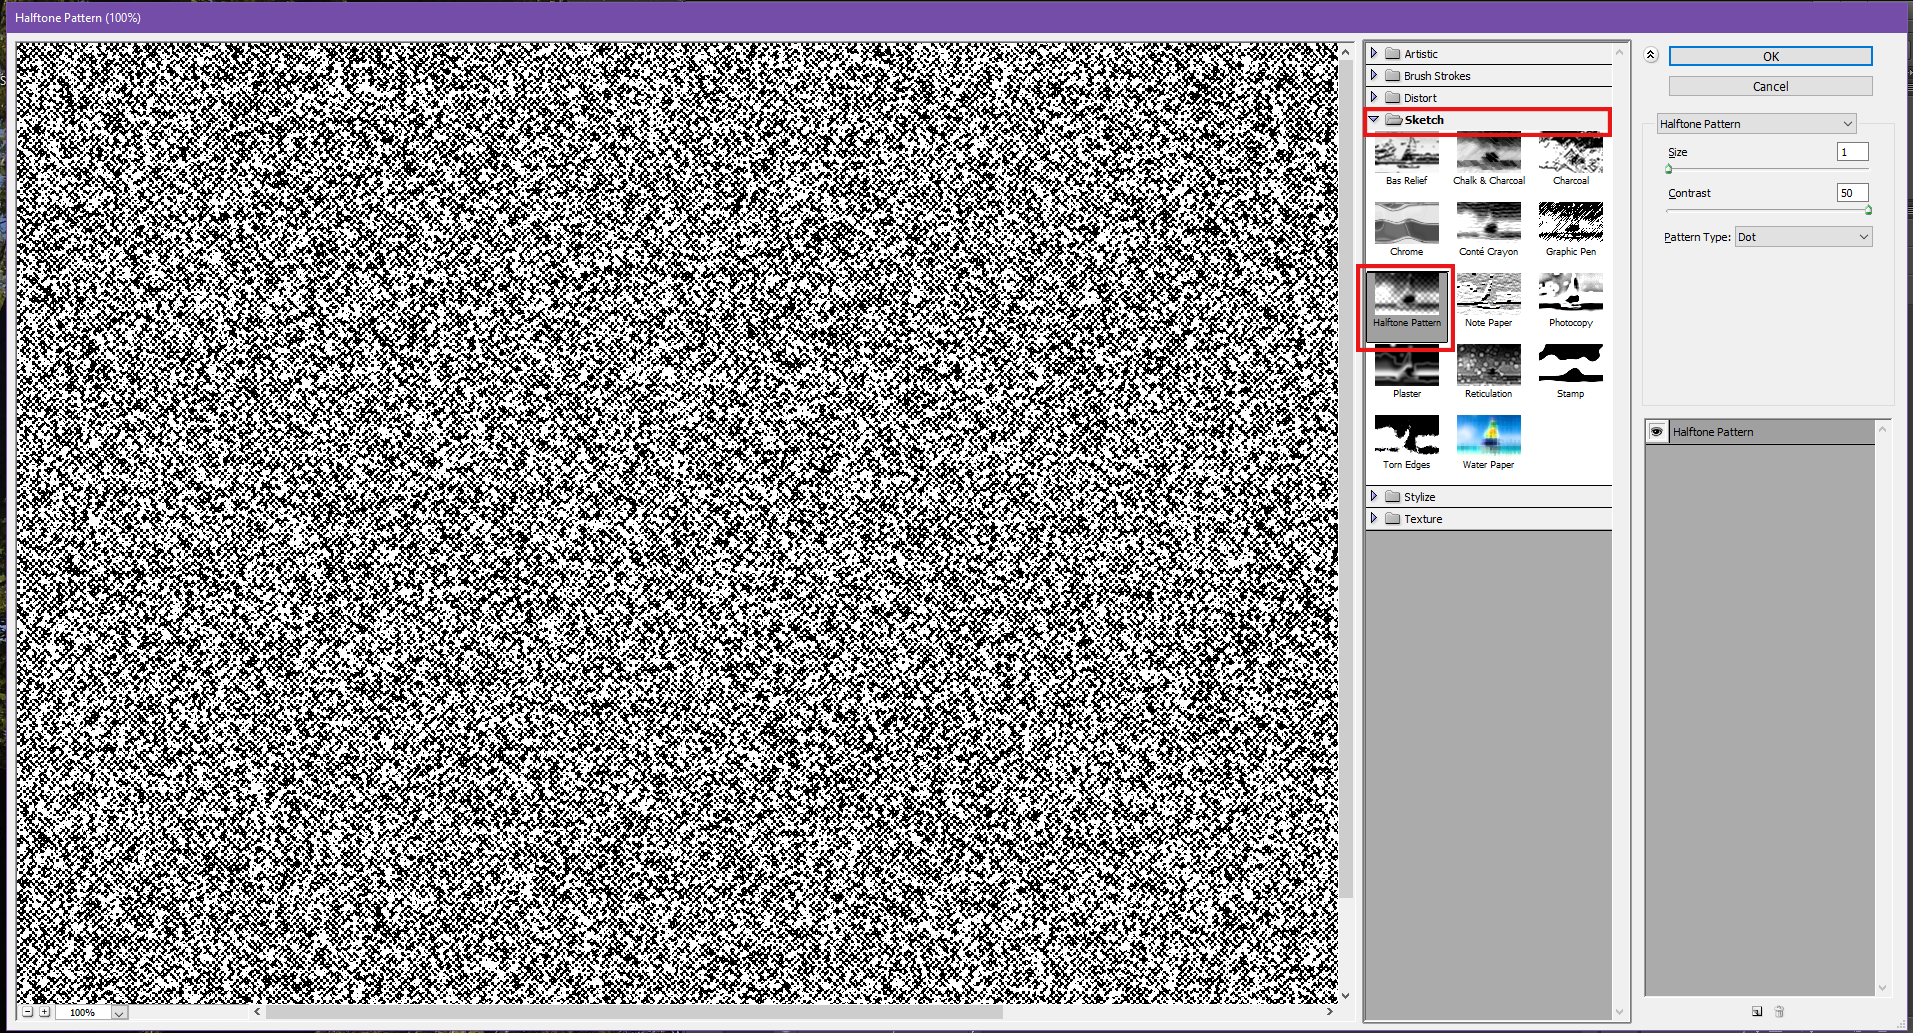
Step 9
Now we’ve got that done, we’re going to actually create the highlights.
To do this, go back up to Filter Gallery – Sketch – Bas Relief. For this Bas Relief, the values should be the same as before (2, 2, Bottom).

Once you’ve applied the Bas Relief, we’re going to add another Motion Blur. Adding this will soften the highlights/reflection.
Again, for this Motion Blur, the values can remain the same (Angle: 0, Distance 118).

Step 10
If you’d like to make the ripples in the water longer, you can do that by applying yet another Gaussain Blur. Then, set the Blend Mode to Soft Light.

Once you change the Blend Mode to Soft Light, your water should look like this:
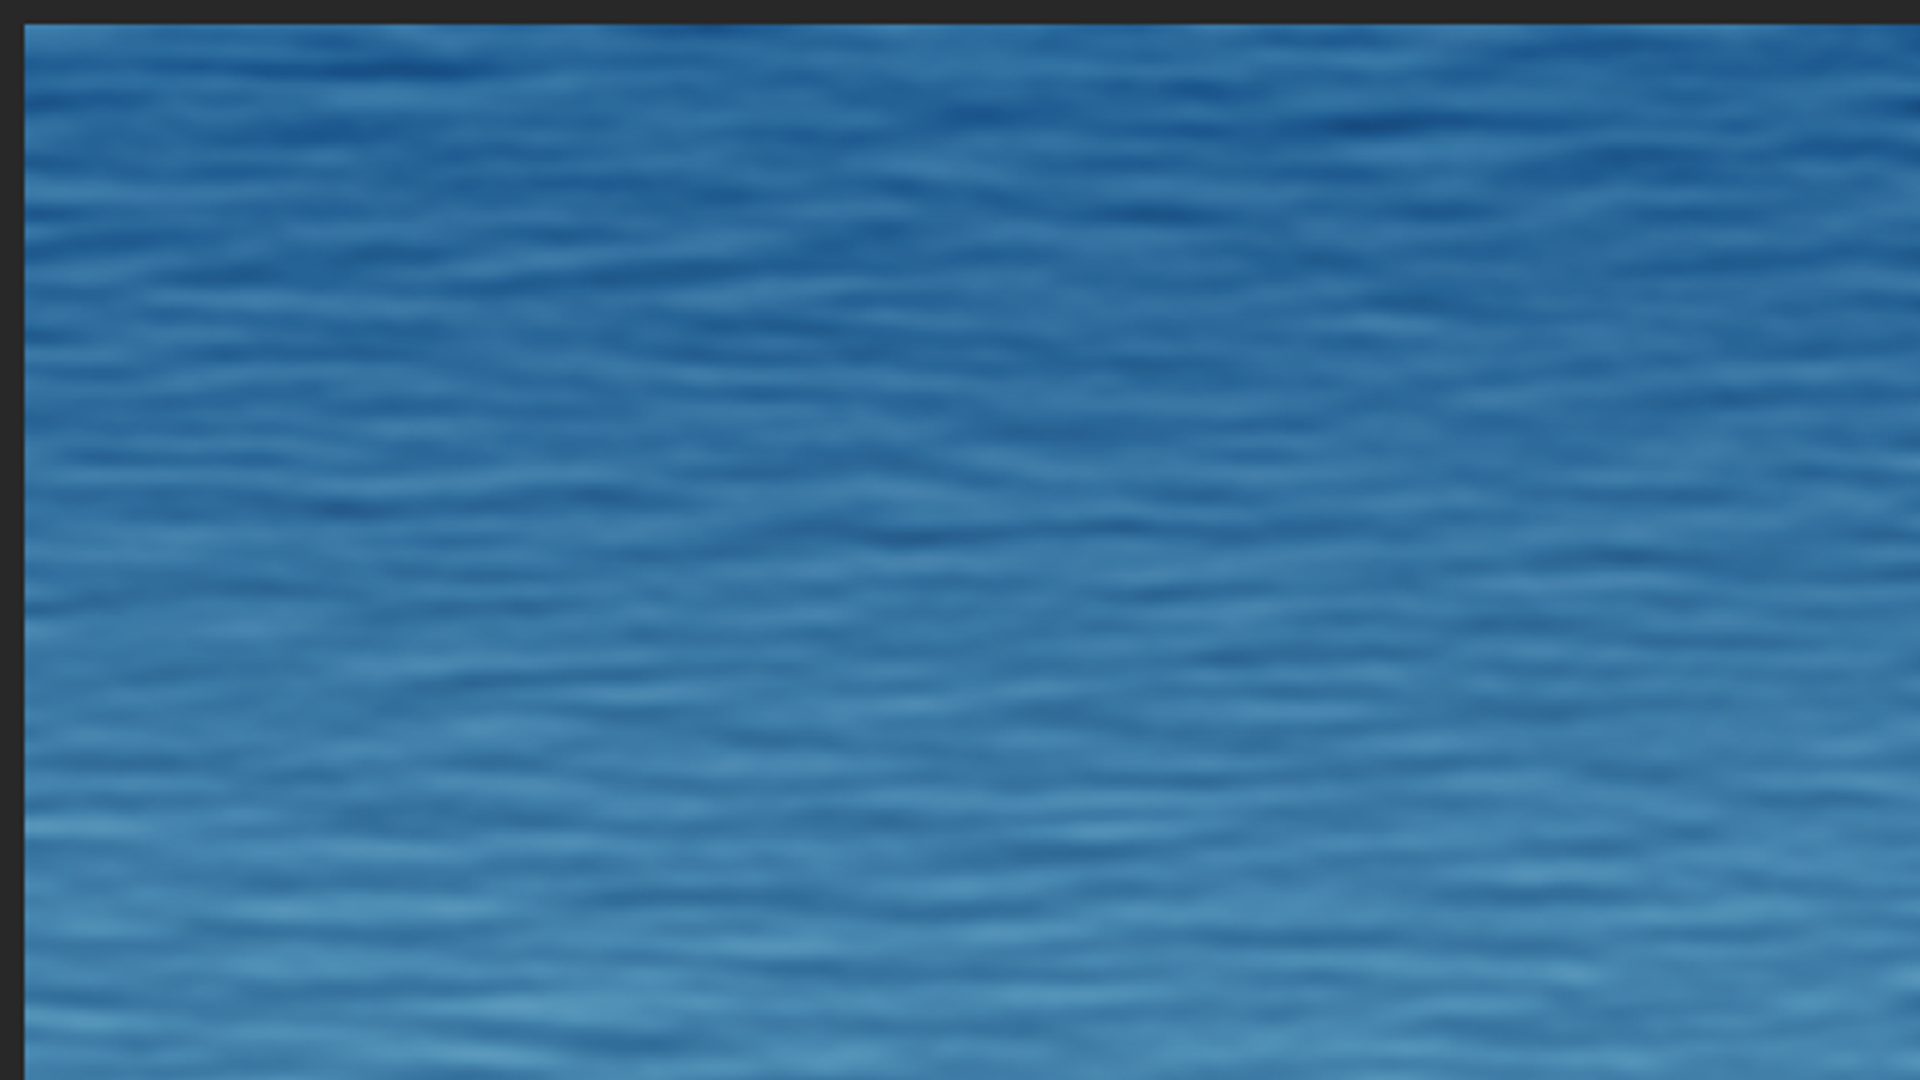
Step 11
Now, we’re going to add a Brightness/Contrast layer to just the Water Texture layer by using a Clipping Mask.
To do this, right-click on the Water Texture layer, then choose Create Clipping Mask.
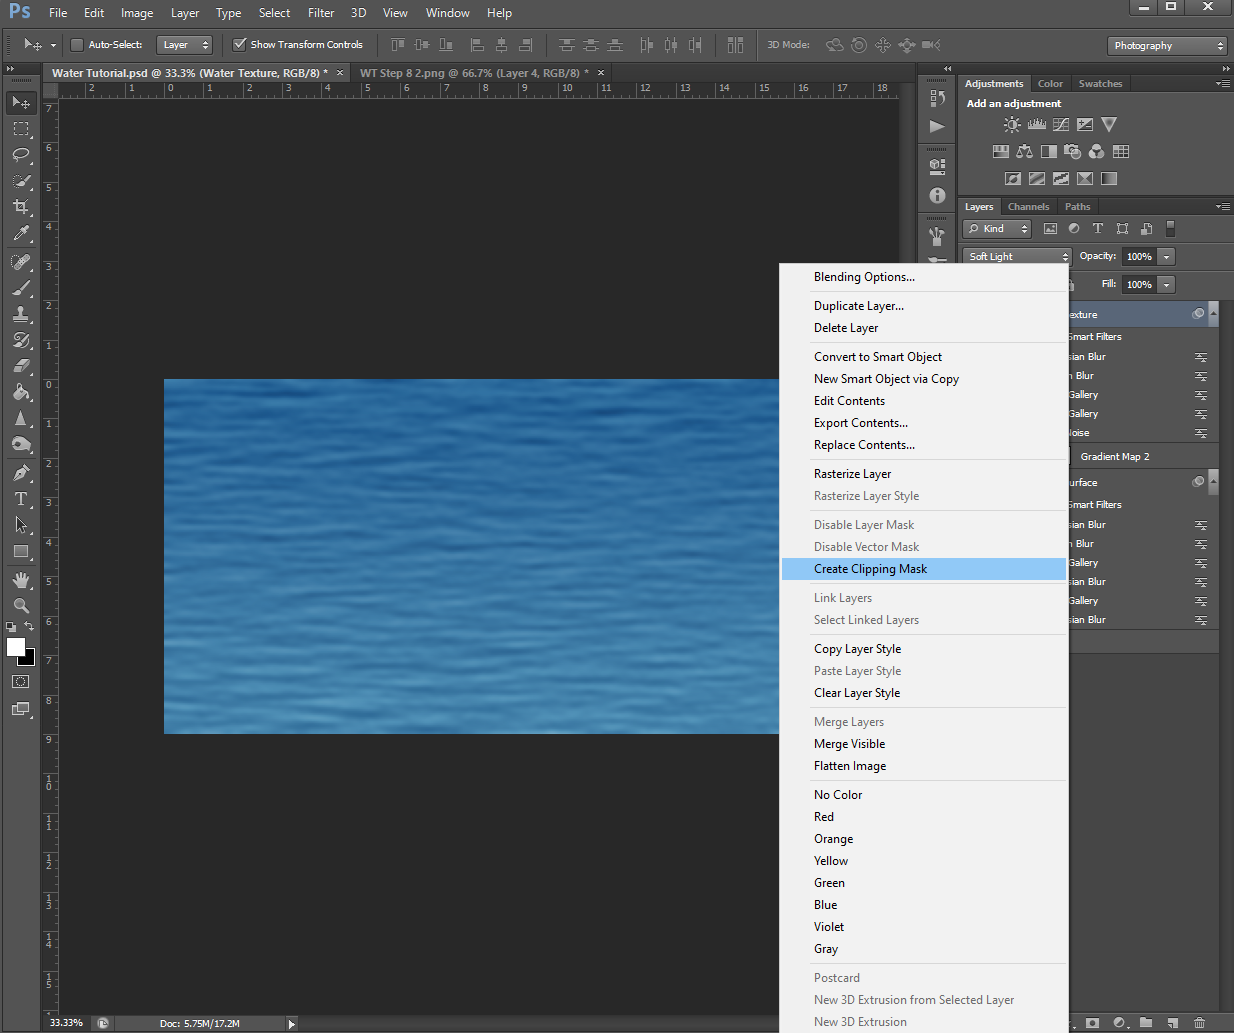
For the Clipping Mask, the Brightness should be set at 9, and the Contrast should be 100. If the panel doesn’t come up automatically, go up to the Adjustments panel (it should be sitting on top of the Layers panel) then click on the sun icon.
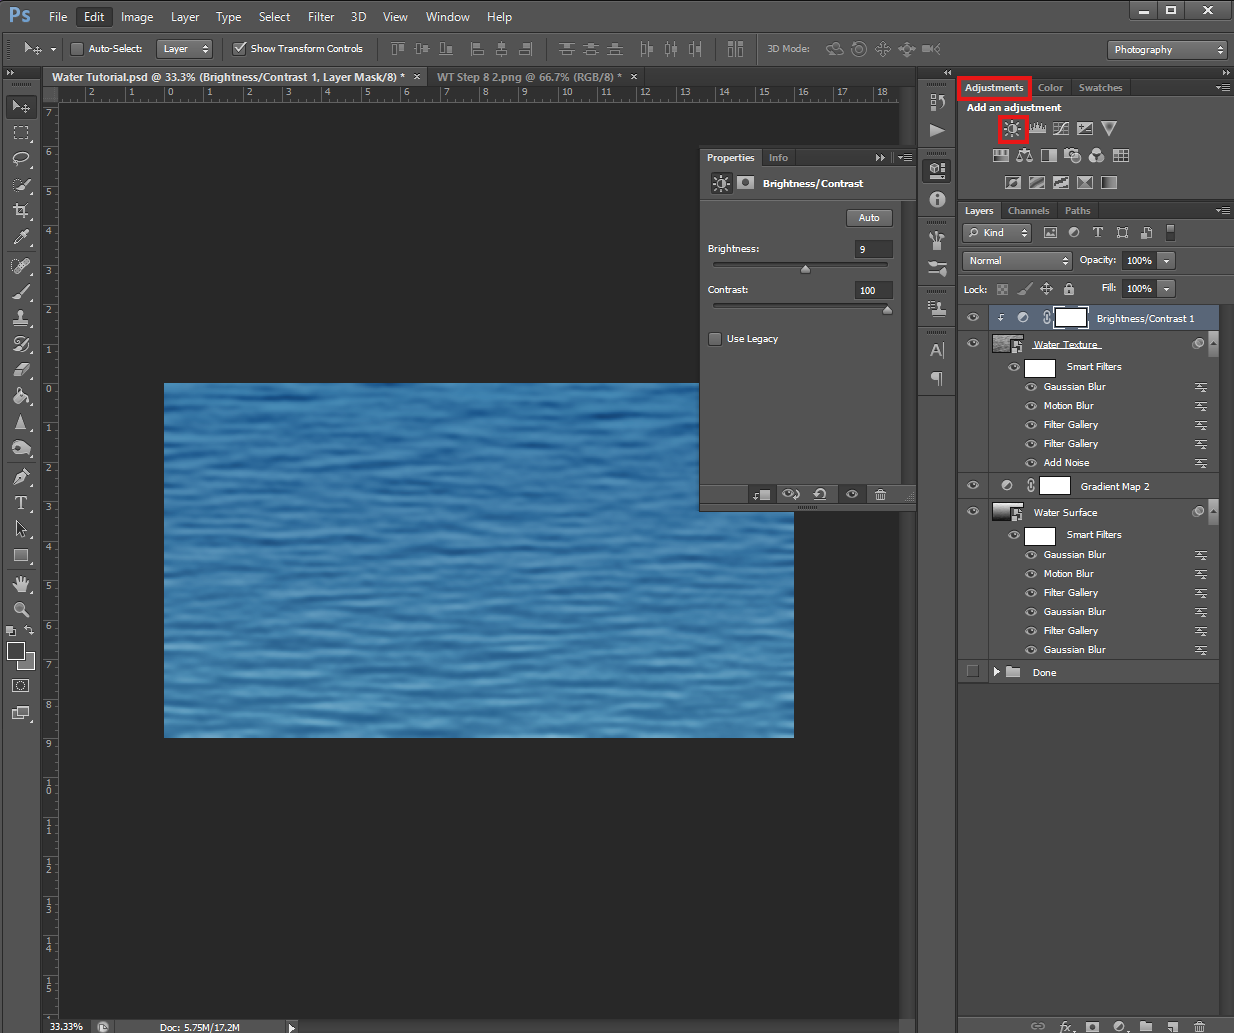
Step 12
Lastly, we’re going to add a Gradient Fill to give this water fake depth by adding a yellow tint. To add a Gradient Fill, go to the Solid Fill at the bottom of the Layers panel, then click on Gradient.

For the Gradient Fill, you should use the following:
Light Yellow: # fbf4cd
Dark: #070605
Style: Linear
Angle: 90
Scale: 100
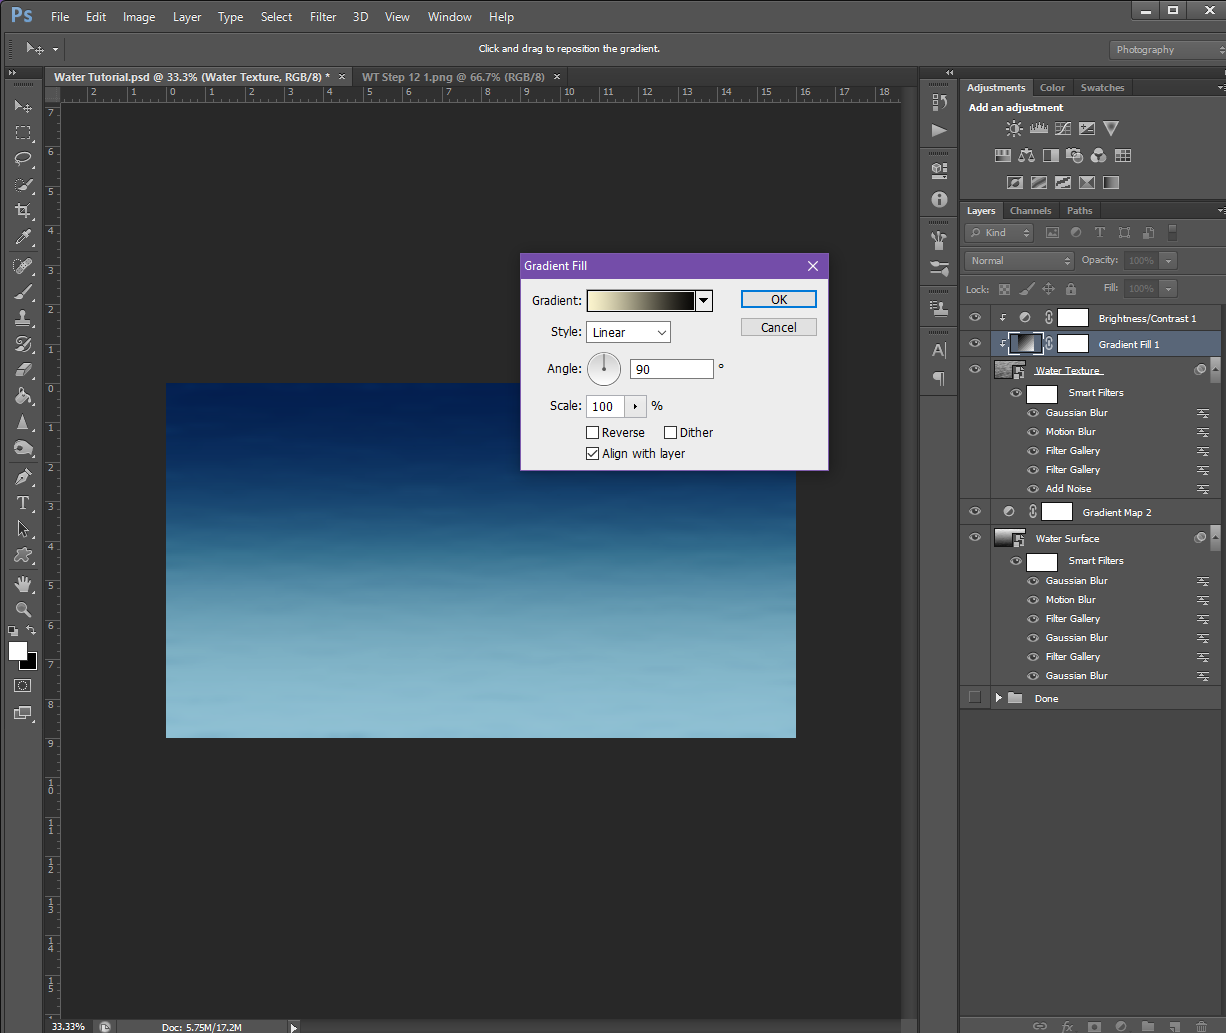
Once all these values are correct, you’re also going to change the Blend Mode to Soft Light, then set the Opacity to 50%.
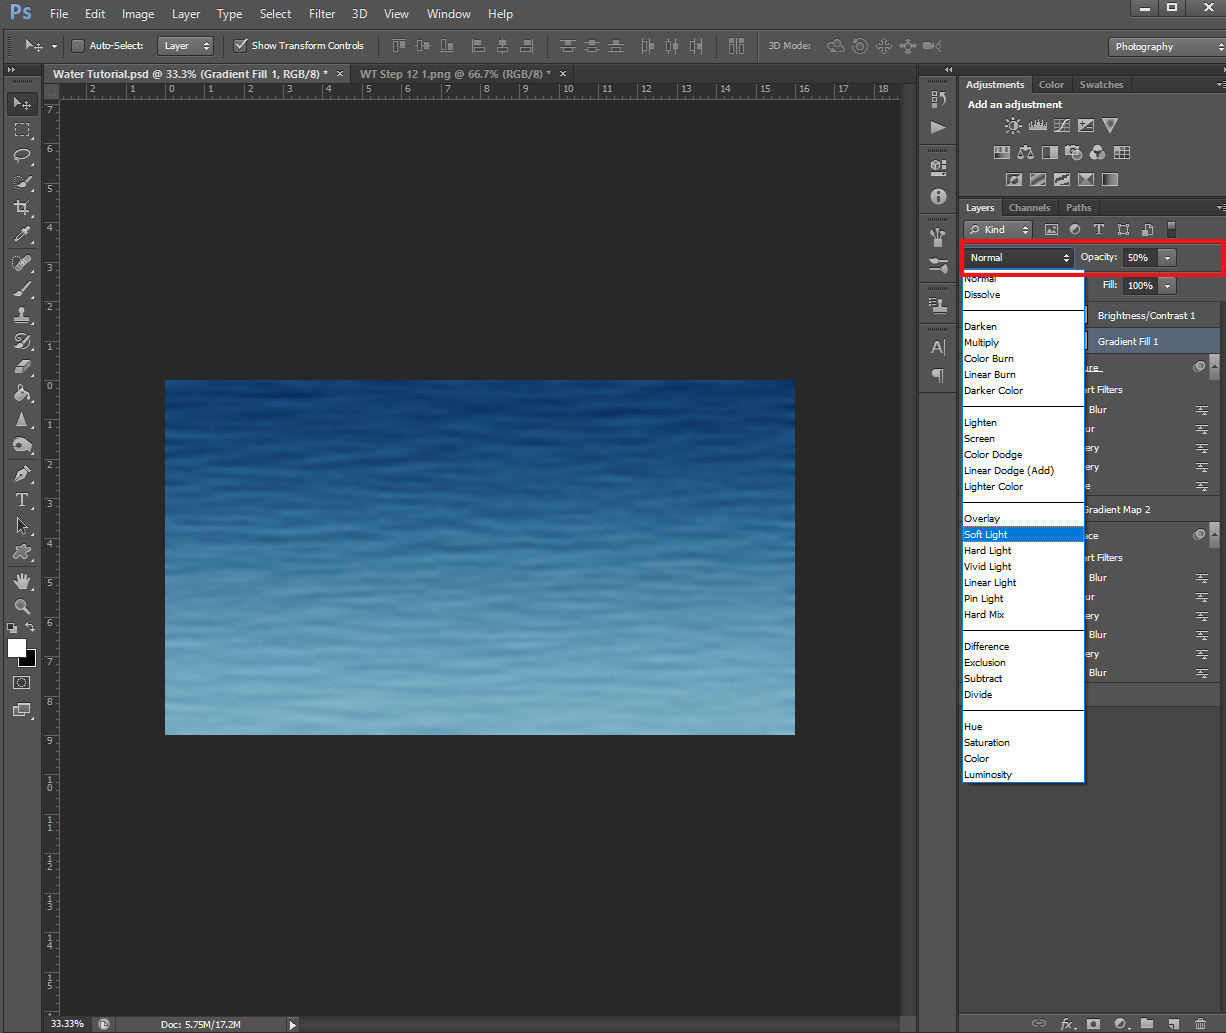
You’ll also want to make sure this Gradient Fill is on top of all the other layers.
And there you have it!
A not-so-simple, but not-as-complicated-as-you-thought way to create water from scratch in Photoshop!
Don’t forget to save the project both as a PHSH file and flatten the layers before saving as a PNG/JPEG.
This one will definitely take some practice to perfect, but it’s a lot of fun to play around with! You can try changing the Opacity of the Water Texture layer for less intense looking ripples, or even play around with the colours.
Who says water has to blue, anyway?
Like this tutorial? Check out the rest of my series here!
